


 5.3.9 Creating a Volume
Group Without Running chdev


 5.3.9 Creating a Volume
Group Without Running chdev
Physical volumes and volume groups are normally not addressed directly by users and applications to access data, and they cannot be manipulated to provide disk space for use by users and applications. However, logical volumes provide the mechanism to make disk space available for use, giving users and applications the ability to access data stored on them.
When you create a logical volume, you specify the number of logical
partitions for the logical volume. A logical partition maps to one, two, or
three physical partitions, depending on the number of copies of your data you
want to maintain. For example, you can specify a logical volume to be mirrored
and have more than one copy as shown in Figure 63. One
copy of the logical volume (the default) indicates that there is a direct
mapping of one logical partition to one physical partition.
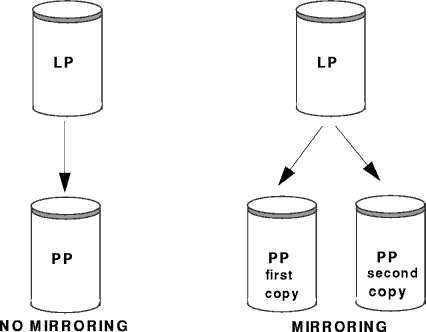
Figure 63: Mapping of LP to PP for Mirrored and Unmirrored
Data
The management of logical volumes is, therefore, the management of disk space that is available for use. This section will review the functions that can be performed by users on logical volumes.
You can create additional logical volumes with the mklv command. This command allows you to specify the name of the logical volume and define its characteristics, including the number and location of logical partitions to allocate for it. The default maximum size for a logical volume at creation is 128 logical partitions, unless specified to be larger.
The mklv command is used to create a new logical volume. Following is the al syntax of the command and the most commonly used flags are shown in Table 7.
mklv [ -a Position ] [ -b BadBlocks ] [ -c Copies ] [ -d Schedule ] [ -e Range ] [ -i ] [ -L Label ] [ -m MapFile ] [ -r Relocate ] [ -s Strict ] [ -t Type ] [ -u UpperBound ] [ -v Verify ] [ -w MirrorWriteConsistency ] [ -x Maximum ] [ -y NewLogicalVolume | -Y Prefix ] [ -S StripeSize ] [ -U Userid ] [ -G Groupid ] [-P Modes ] VolumeGroup Number [ PhysicalVolume ... ]
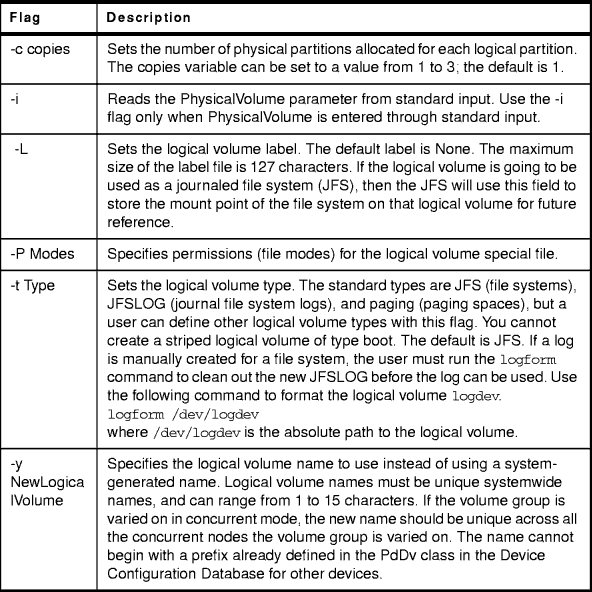
The following example shows the use of mklv command to create a new logical volume, newlv. This will create a logical volume called newlv in the rootvg and it will have 10 logical partitions and each logical partition consists of two physical partitions.
mklv -y newlv -c 2 rootvg 10
You can use the following SMIT hierarchy to create a logical volume.
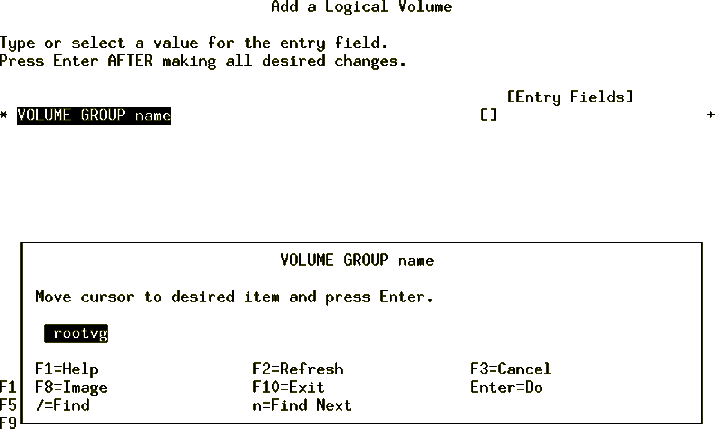
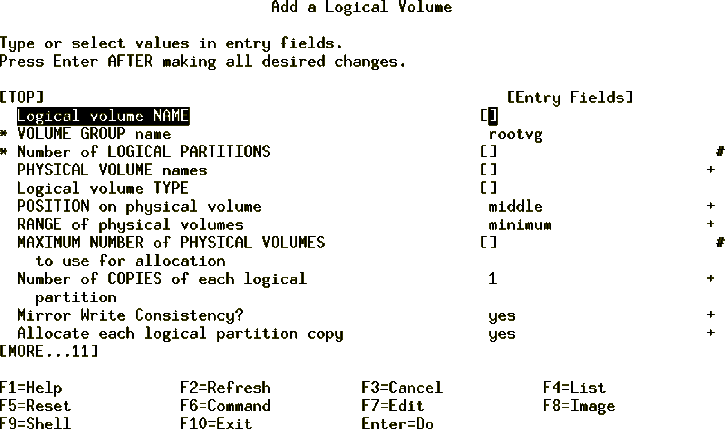
You may need to remove a logical volumes if it is no longer in use for storage purposes by users and applications. The rmlv command can be used to remove a logical volume.
The rmlv command is used to remove a logical volume. Following is the general syntax of the command and its commonly used flags are shown in Table 8.
rmlv [ -f ] [ -p Physical Volume ] LogicalVolume ...

The following example shows the command to remove a logical volume, newlv.
# rmlv newlv
Warning, all data on logical volume newlv will be destroyed.
rmlv: Do you wish to continue? y(es) n(o) y
#
Entering a y as the response to this dialogue and pressing Enter will complete the process of deletion of a logical volume.
Alternatively, you can use the SMIT fast path command, smitty rmlv, to remove a logical volume.
In this section, you will attempt to remove the Logical Volume templv, but with a few surprises when the rootvg is full.
Unmount the Logical Volume:
umount /dev/templv
Unmount the logical volume that will be removed:
# rmlv templv
Warning, all data contained on logical volume templv will be destroyed.
rmlv: Do you wish to continue? y(es) n(o)? y
/tmp/lvmap11780: There is not enough space in the file system.
0516-912 rmlv: Unable to remove logical volume templv.
While removing the logical volume, you receive the preceding error message. Check disk space by entering the following:
# df
Filesystem    512-blocks      Free %Used    Iused %Iused Mounted on
/dev/hd4           32768         0  100%     1868    16% /
/dev/hd2         4702208         0  100%    51167     9% /usr
/dev/hd9var        16384         0  100%      183     9% /var
/dev/hd3           32768         0  100%       34     1% /tmp
/dev/hd1           16384         8  100%       49     3% /home
/dev/userlv     16793600   9968728   41%       21     1% /u
The file systems /, /usr, /var, /tmp, and /home are full. There are two options to fix this problem.
After investigation you will find that there is a file called bigfile, which is an unused file that is taking up space on the file system /tmp and /home. Delete this file from the two file systems. The other file systems will be resized using the chfs command.
To delete the obsolete files from /tmp and /home, do the following:
# cd /tmp
# rm bigfile
# cd /home
# rm bigfile
# cd /
# df
Filesystem    512-blocks      Free %Used    Iused %Iused Mounted on
/dev/hd4           49152         0  100%     1868    16% /
/dev/hd2         4702208         0  100%    51167     9% /usr
/dev/hd9var        16384         0  100%      183     9% /var
/dev/hd3           32768     31568    4%       33     1% /tmp
/dev/hd1           16384     15656    5%       48     3% /home
/dev/userlv     16793600   9968728   41%       21     1% /u
To resize the other three file systems enter:
smitty jfs
From the Journaled File Systems menu select, the
Change / Show Characteristics of a Journaled File System option as
displayed in Figure 66.
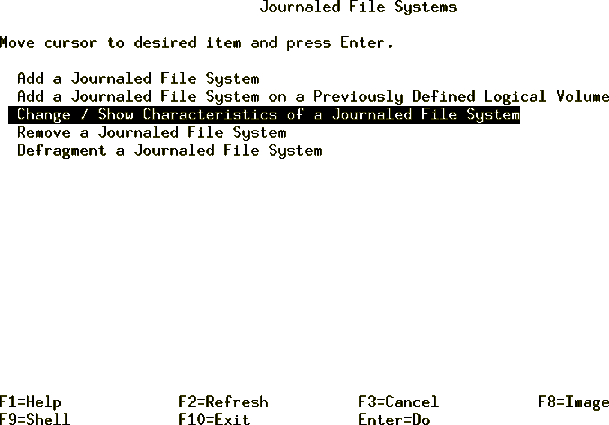
Figure 66: Journaled File Systems Menu
Once the Change / Show Characteristics of a Journaled File System option has
been taken, a File System Name submenu will appear. Select the file system to
which changes will be made as displayed in Figure 67.
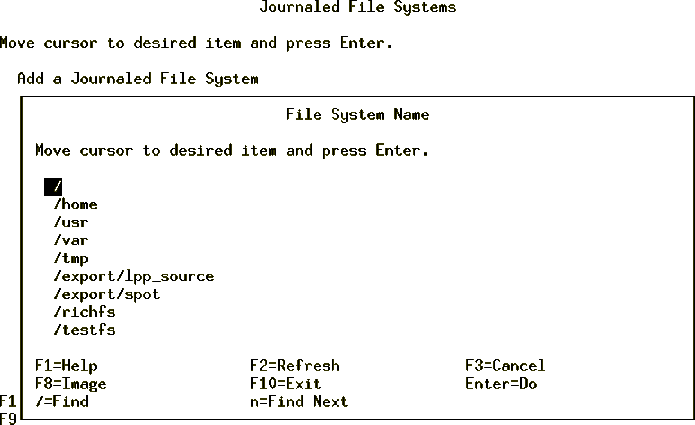
Figure 67: File System Name Submenu
Figure 68 shows the original characteristics of the /
(root) file systems. Go down to the Size of file system (in 512-byte blocks)
option.
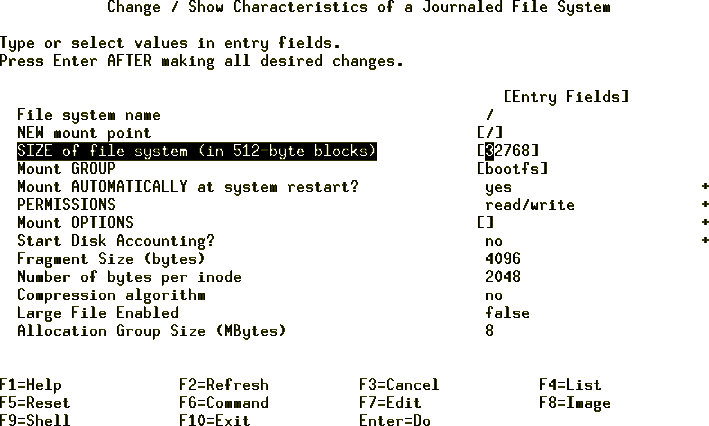
Figure 68: Original Change / Show Characteristics of a JFS
Menu
Figure 69 shows the same menu as
Figure 68, except the Size of file system (in 512-byte
blocks) has been changed. The size can only be increased.
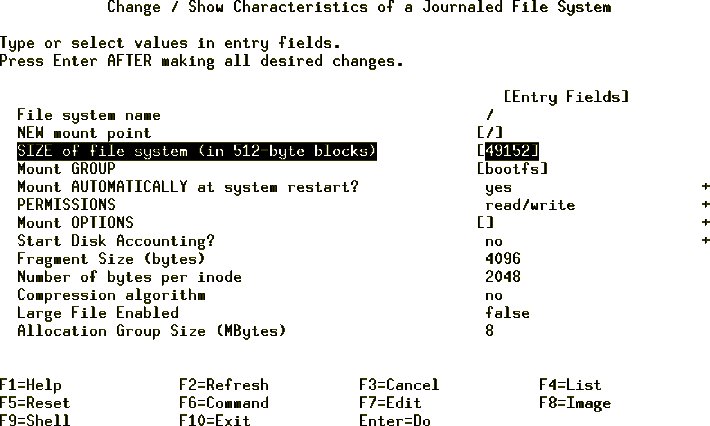
Figure 69: New Change / Show Characteristics of a Journaled File System
Menu
In Figure 70, the Command Status window displaying the
success of the operation to increase the size of a file system is shown.
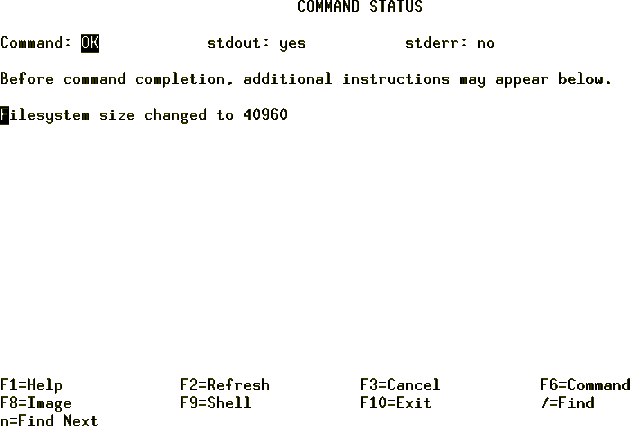
Figure 70: Command Status Window
Press F10 to exit out of the SMIT system and go back to the command line.
To check the new size of the file system, enter:
# df
Filesystem    512-blocks      Free %Used    Iused %Iused Mounted on
/dev/hd4           49152     25856   48%     1867    16% /
/dev/hd2         4702208         0  100%    51167     9% /usr
/dev/hd9var        16384         0  100%      183     9% /var
/dev/hd3           32768     31568    4%       33     1% /tmp
/dev/hd1           16384     15656    5%       48     3% /home
/dev/userlv     16793600   9968728   41%       21     1% /u
To change the size of the file system /usr and /var from the command line enter:
# chfs -a size='5000000' /usr
Filesystem size changed to 5013504
# chfs -a size='32768' /var
Filesystem size changed to 32768
To check the size of the file systems enter:
# df
Filesystem    512-blocks      Free %Used    Iused %Iused Mounted on
/dev/hd4           49152     25848   48%     1867    16% /
/dev/hd2         5013504    301520   94%    51167     9% /usr
/dev/hd9var        32768     15864   52%      183     5% /var
/dev/hd3           32768     31568    4%       33     1% /tmp
/dev/hd1           16384     15656    5%       48     3% /home
/dev/userlv     16793600   9968728   41%       21     1% /u
The file systems now all have additional space. Remove the logical volume by entering the following:
# rmlv templv
Warning, all data contained on logical volume templv will be destroyed.
rmlv: Do you wish to continue? y(es) n(o)? y
rmlv: Logical volume templv is removed.
The logical volume has been removed. To remove the volume group enter:
# reducevg -df tempvg hdisk4
rmlv: Logical volume loglv01 is removed.
ldeletepv: Volume Group deleted since it contains no physical volumes.
The volume group has been removed and the physical volume made available for use on another volume group. To verify this, enter:
# lspv
hdisk0         000919746edab91f    rootvg
hdisk1         0009197459d92f2e    None
hdisk2         00091974d381d097    uservg
hdisk3         00091974d81ff431    uservg
hdisk4         00091974de731316    None
hdisk5         00091974e4f3d56e    None
hdisk6         0009197425444544    raidvg
The following steps could be performed to reduce the size of a logical volume to free up the excess logical partition allocation.
The resulting free space could be put to better use by allocating it to other logical volumes requiring it.
An existing logical volume can be increased in size by using the extendlv command or SMIT.
If the logical volume is used by a journaled file system, you can also use the chfs command or SMIT fast path command smitty chjfs to increase the size of the logical volume.
The extendlv command is used to increase the size of a logical volume. Following is the general syntax of the command and its commonly used flags.
extendlv [ -a Position ] [ -e Range ] [ -u Upperbound ] [ -s Strict ] LogicalVolume Partitions [ PhysicalVolume ... ]
The following example shows the use of the extendlv command to add three more logical partitions to the logical volume you created:
extendlv newlv 3
The following SMIT fast path command can be used to increase the size of a logical volume:
smitty extendlv
Logical volumes may need to be copied for a number of reasons. If a disk is to be removed and replaced with a new disk, the logical volumes on that disk will need to be copied to the new disk. Logical volumes can be copied to new logical volumes or to existing logical volumes which are then overwritten.
The following example shows the use of cplv command to copy a logical volume:
cplv -v myvg -y newlv oldlv
This copies the contents of oldlv to a new logical volume called newlv in the volume group myvg. If the volume group is not specified, the new logical volume will be created in the same volume group as the old logical volume. This command creates a new logical volume.
The following example demonstrates how to copy a logical volume to an existing logical volume.
cplv -e existinglv oldlv
This copies the contents of oldlv to the logical volume existinglv. Confirmation for the copy will be requested as all data in existinglv will be overwritten.
If existinglv is smaller than oldlv, then data will be lost, probably resulting in corruption.
Copying a logical volume can also be done through smit using the smit cplv fastpath.
| Note |
|---|
|
Do not copy from a larger logical volume containing data to a smaller one. Doing so results in a corrupted file system because some data (including the superblock) is not copied. This command will fail if the cplv creates a new logical volume and the volume group is varied on in concurrent mode. |
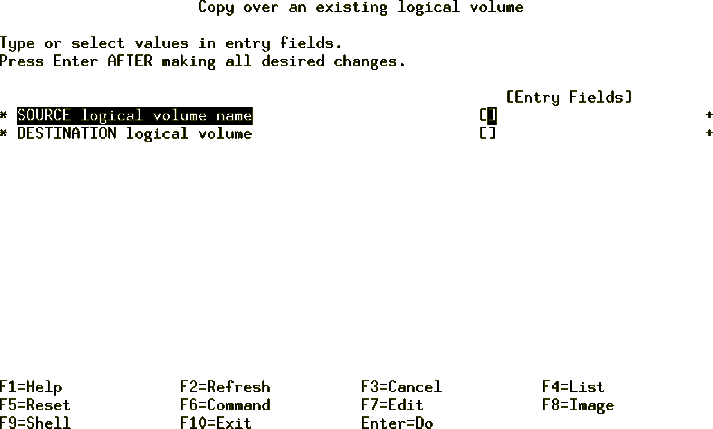
Alternatively, you can use the SMIT fast path command, smitty cplv
to obtain a screen as shown in Figure 71.
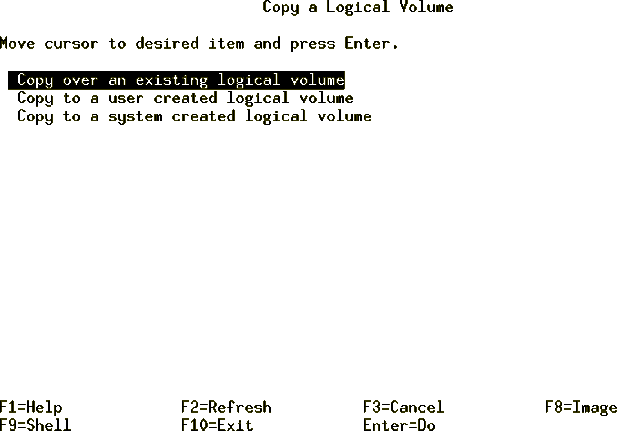
Figure 71: cplv - Step 1
| Note |
|---|
|
You might encounter the following error. cplv : Destination logical volume must have type set to copy If this is the case, use the following command. chlv -t copy <Destination Logical Volume Name> Return to your SMIT session. Now the system will allow you to copy the logical volume. This has been done to ensure extra security so that you do not overwrite your data accidently. |
The following logical volumes are automatically created at the system installation time.
hd1 This logical volume is used by the /home file system.
The following example will list all the logical volumes defined on the system as shown in Figure 73.
lsvg | lsvg -il
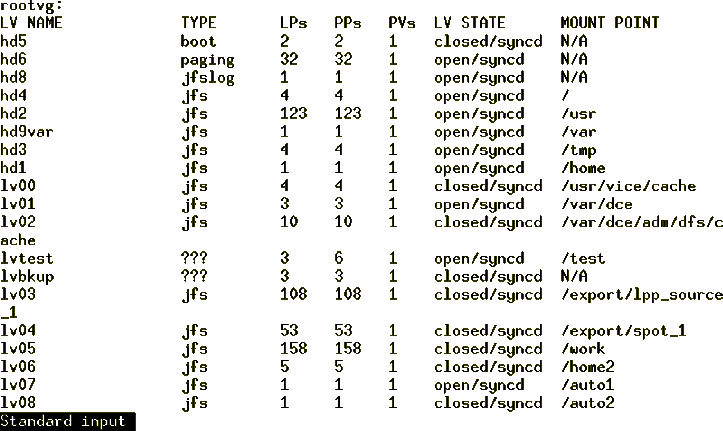
Figure 73: Logical Volume Listing
The lslv command can be used to view all the attributes related to
a logical volume (newlv) as shown in Figure 74.
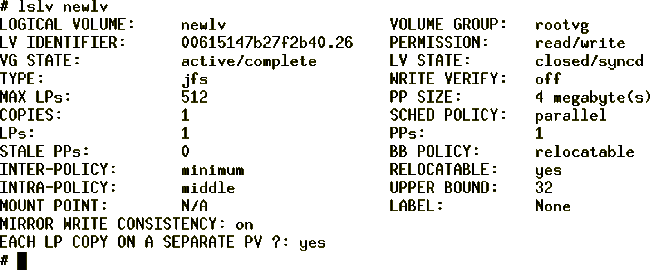
Figure 74: Logical Volume Attributes
The size of a logical volume is the space that is allocated to the logical volume and is a factor of the number of logical partitions that are allocated to the logical volume and the number of copies that you have told the system to maintain.Therefore, the total space taken up by the logical volume is determined by the following formula.
Total LV size=PP size * LPs assigned to LV * Number of copies of the LV
The following example shows how to calculate the logical volume size.
If PP size is 4 MB, LPs assigned to the logical volume are 10, and the number of copies of the logical volume are 2, then the total space that will be allocated to this logical volume will be 80 MB (4*10*2).
Striping is a technique for spreading the data in a logical volume across several disk drives in such a way that the I/O capacity of the disk drives can be used in parallel to access data on the logical volume. The primary objective of striping is for high-performance reading and writing of large sequential files.
In an ordinary logical volume, the data addresses correspond to the sequence of blocks in the underlying physical partitions. In a striped logical volume, the data addresses follow the sequence of stripe units. A complete stripe consists of one stripe unit on each of the physical devices that contains part of the striped logical volume. The LVM determines which physical blocks on which physical drives correspond to a block being read or written. If more than one drive is involved, the necessary I/O operations are scheduled for all drives simultaneously.
The way you would set up the logical volume striping is by using the vmtune command.
The vmtune command changes operational parameters of the Virtual Memory Manager (VMM) and other AIX components.
The vmtune command can only be executed by root. Changes made by the vmtune command persist until the next reboot of the system. If a permanent change in VMM parameters is needed, an appropriate vmtune command should be put in inittab.
The vmtune command syntax is as follows:
vmtune [ -b numfsbuf ] [ -B numpbuf ] [ -c numclust ] [ -f minfree ] [ -F maxfree ] [ -k npskill ] [ -l lrubucket ] [ -M maxpin ] [ -N pd_npages ] [ -p minperm ] [ -P maxperm ] [ -r minpgahead ] [ -R maxpgahead ] [-u lvm_budcnt] [ -w npswarn ] [-W maxrandwrt]
Provided in Table 9 are the flags and their
descriptions for the vmtune command.
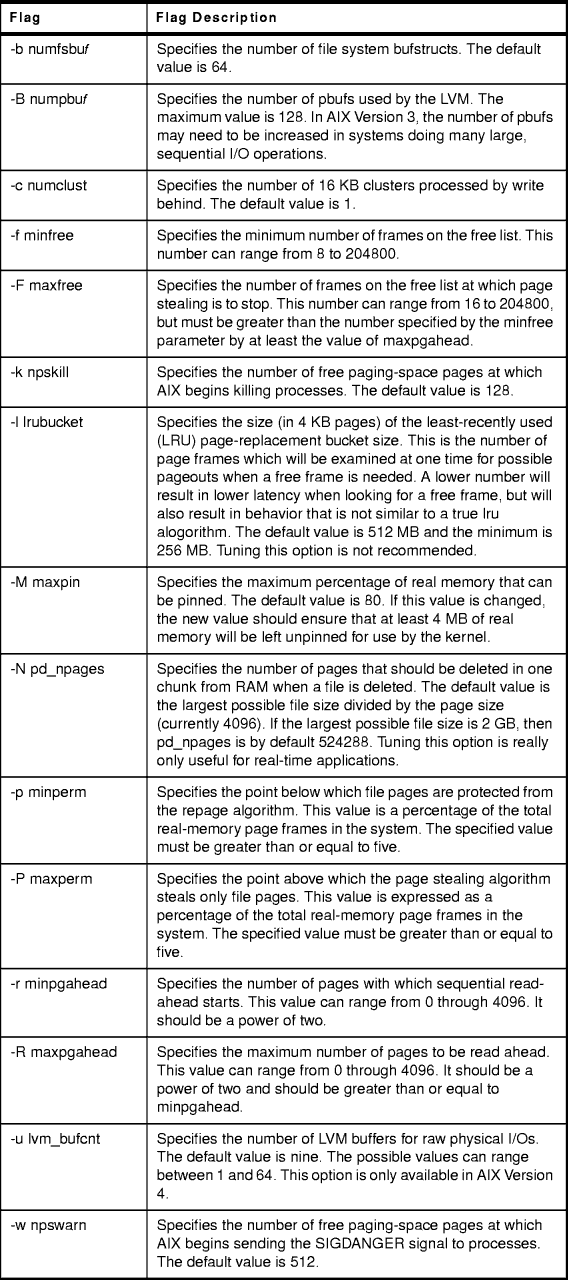
Table 9: vmtune Command Flags and Flag Descriptions
The recommended values for logical volume striping are:
The maxfree and minfree settings should be done after doing some investigation into the vmstat command and then setting the system according to your system requirements. For a better understanding of tuning your AIX system, consult the AIX Versions 3.2 and 4 Performance Tuning Guide, SC23-2365. For this example, use a value of 128:
For this section, assume the following devices exist:
# lspv
hdisk0         000919746edab91f    rootvg
hdisk1         0009197459d92f2e    uservg
hdisk2         00091974d381d097    uservg
Your system has three disk drives, using the recommended values described for logical volume striping, your values would be:
minpgahead 2
maxpgahead 48 (3x16)
minfree 128
maxfree 176 (48 + 128)
To set the system up with these parameters enter:
/usr/lpp/bos/samples/vmtune -f 128 -F 144 -r 2 -R 176
To make these changes permanent, enter the above line into /etc/inittab.