


 5.4.8 Logical Volume
Striping
5.4.8 Logical Volume
StripingA file system is a set of files, directories, and other structures. File systems maintain information and identify of the location of a file or directory's data. In addition to files and directories, file systems contain a boot block, a superblock, bitmaps, and one or more allocation groups. An allocation group contains disk i-nodes and fragments.
The following three types of file systems are supported on an AIX system.
The Journaled File System (JFS) divides the logical volume into a number of fixed size units called logical blocks. The logical blocks in the file system are organized as follows:
The size for a journaled file system (JFS) is defined when the file system is created considering the following parameters:
The total number of i-nodes in a file system limits the total number of files and the total size of the file system. The JFS provides the nbpi (number of bytes per i-node) parameter that affects the number of i-nodes in a file system. JFS supports nbpi values of 512, 1024, 2048, 4096, 8192, 16384, 32768, 65536, and 131072. The values 32768, 65536, and 131072 only apply to AIX Version 4.2 or later.
For example, to create an 8 MB file system with an nbpi value of 4096, an i-node will be generated for each 4096 bytes of data. This would result in a maximum of 2048 i-nodes for an 8 MB file system, which means that if every file in the file system is ideally 4 KB in length, a maximum of 2048 files can be created in the file system.
The JFS restricts all file systems to 16 MB (224) i-nodes.
AIX Version 4.2 or later supports various allocation group sizes. The JFS
segregates file system space into groupings of i-nodes and disk blocks for user
data. These groupings are called allocation groups. The allocation group size
can be specified when the file system is created. The allocation group sizes
are 8 MB, 16 MB, 32 MB, and 64 MB. Each allocation group size has an associated
nbpi range. The ranges are defined by the following table:
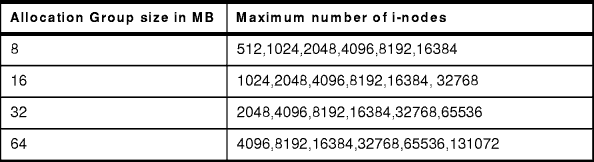
Table 10: Allowable nbpi Values
The JFS supports four fragment sizes: 512, 1024, 2048, and 4096 byte units of contiguous disk space. The JFS maintains fragment addresses in i-nodes and indirect blocks as 28-bit numbers. Each fragment must be addressable by a number from 0 to (228).
Multiple journaled file systems use a common log, called a JFS log, configured to be 4 MB in size. For example, after initial installation, all file systems within the root volume group use logical volume hd8 as a common JFS log. The default logical volume partition size is 4 MB, and the default log size is one partition, therefore, the root volume group normally contains a 4 MB JFS log. When file systems exceed 2 GB or when the total amount of file system space using a single log exceeds 2 GB, the default log size needs to be increased. The JFS log is limited to a maximum size of 256 MB.
The maximum JFS size is defined when the file system is created. For example, selecting an nbpi ratio of 512 will limit the file system to a size of 8 GB (512 * 228 = 8 GB). When creating a JFS file system, the factors listed (nbpi, fragment size, and allocation group size) need to be weighed carefully. The file system size limitation is the minimum of NPBI * 224 or Fragment Size * 228.
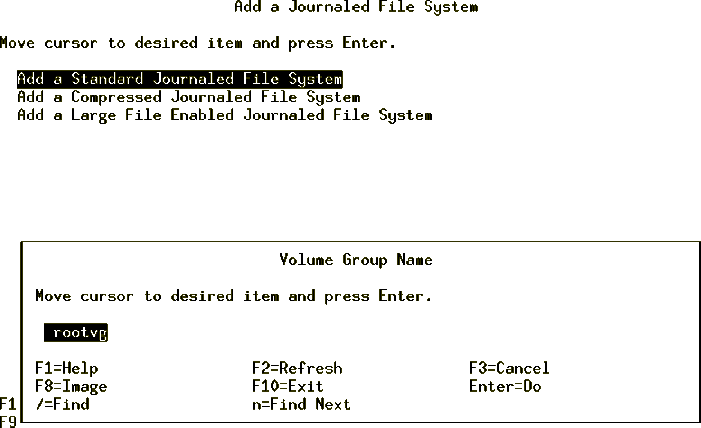
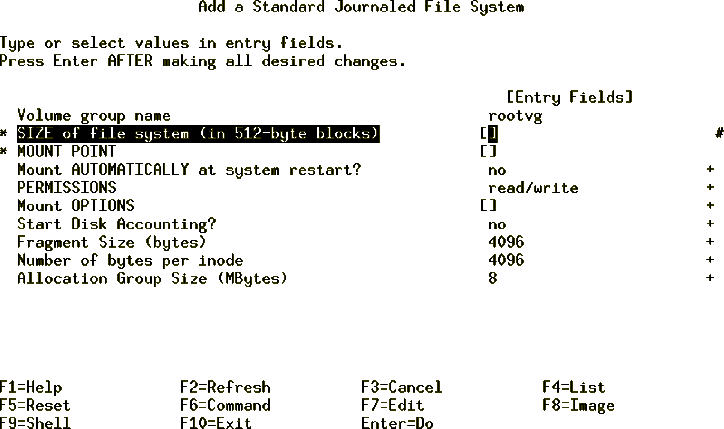
Every file system in AIX corresponds to a logical volume. In order to create a journaled file system use the following SMIT hierarchy.
| Note |
|---|
|
In AIX, all of the I/O is in 4 KB blocks, however, space is allocated in multiples of 512 byte blocks. This is done just to remain consistent with other UNIX systems. The smallest file system that you can create is equal to one PP, therefore, even if you mention the number of blocks to be less than one PP, the system will still create a file system equal to one PP. The following example shows how to calculate the number of blocks for a given amount of space in MB.
This indicates that the equivalent number of blocks for a file system of 2 MB are 4096 (Enter this number in the Size of File System field). |

Alternatively, you can achieve the same task on the command line using the following command:
crfs -v jfs -g rootvg -a size=8192 -m /dummy
This will create a journaled file system of 8 MB with /dummy as the mount point in the rootvg volume group.
Mounting is a concept that makes file systems, files, directories, devices, and special files available for use at a particular location. It is the only way a file system is made accessible. Once you have created the file system, the next task is to make it available to your users. In order to do that, you must know how AIX manages the patching of the newly created file systems into its file tree using the mount points.
Figure 79 shows a file system mount point (/u/dick)
before a file system is mounted over it.
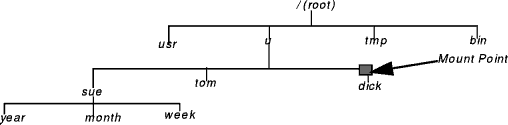
Figure 79: File Tree View before Mounting
Figure 80 shows a mounted file system /u/dick over the
/u/dick mount point.
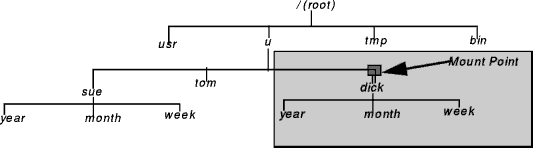
Figure 80: File Tree View after Mounting
| Note |
|---|
|
The following command shows how to mount a file system (/FileSystemX).
mount /FileSystemX
Alternatively, if you know the name of the device associated with your file system you can use the device name to mount your newly created file system.
If you want to mount all the file systems, you can use the following command to mount all the file systems at one time.
mount {-a|all}
A file system can be also be mounted using the following SMIT fast path hierarchy.


Mounts can be set to occur automatically during system initialization. There are two types of automatic mounts:
You can specify a file system to be mounted automatically when you either use the mount all command or the by the /etc/rc script at the initialization time. You can achieve this by setting the Mount AUTOMATICALLY at system restart parameter to TRUE when you are creating a file system. (See Figure 77)
The following example shows the use of command mount without a flag to display information about all the currently mounted file systems.
# mount
node       mounted        mounted over    vfs       date        options
-------- ---------------  ---------------  ------ ------------ ---------------
         /dev/hd4         /                jfs    Oct 25 18:20 rw,log=/dev/hd8
         /dev/hd2         /usr             jfs    Oct 25 18:20 rw,log=/dev/hd8
         /dev/hd9var      /var             jfs    Oct 25 18:20 rw,log=/dev/hd8
         /dev/hd3         /tmp             jfs    Oct 25 18:20 rw,log=/dev/hd8
         /dev/lv01        /var/dce         jfs    Oct 25 18:21 rw,log=/dev/hd8
         /dev/hd1         /home            jfs    Oct 27 15:14 rw,log=/dev/hd8
         /dev/lvtest      /test            jfs    Oct 27 15:17 rw,log=/dev/hd8
         /dev/lv07        /auto1           jfs    Oct 27 15:34 rw,log=/dev/hd8
The following example shows the steps involved to remove a file system.
# mount
node       mounted        mounted over    vfs       date        options
-------- ---------------  ---------------  ------ ------------ ---------------
         /dev/hd4         /                jfs    Oct 25 18:20 rw,log=/dev/hd8
         /dev/hd2         /usr             jfs    Oct 25 18:20 rw,log=/dev/hd8
         /dev/hd9var      /var             jfs    Oct 25 18:20 rw,log=/dev/hd8
         /dev/hd3         /tmp             jfs    Oct 25 18:20 rw,log=/dev/hd8
         /dev/lv01        /var/dce         jfs    Oct 25 18:21 rw,log=/dev/hd8
         /dev/hd1         /home            jfs    Oct 27 15:14 rw,log=/dev/hd8
         /dev/lvtest      /test            jfs    Oct 27 15:17 rw,log=/dev/hd8
         /dev/lv07        /auto1           jfs    Oct 27 15:34 rw,log=/dev/hd8
umount <filesystem name>
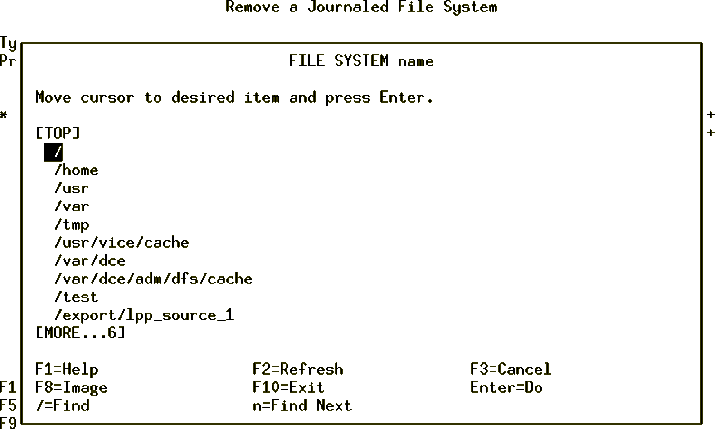
Alternatively, using the SMIT fast path command smitty rmjfs to
remove a journaled file system will display a screen similar to the one shown
in Figure 84.
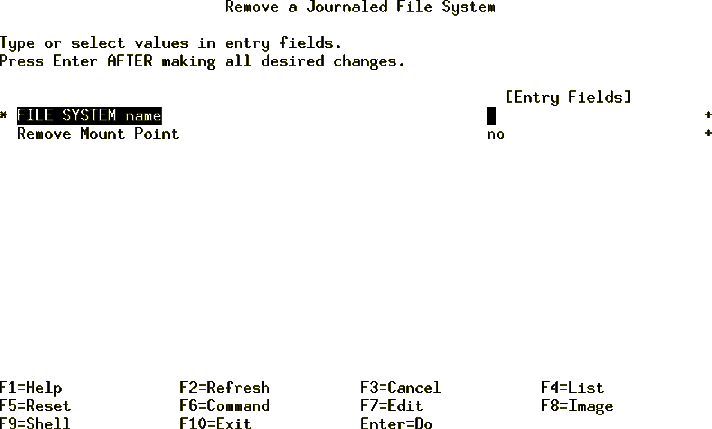
Figure 84: rmjfs - Step 1
AIX provides you the facility to increase the size of a file system dynamically, provided you have enough free space available on your disk. File systems that are low on space might create unanticipated problems.
| Note |
|---|
|
Whenever a file system is full, the system cannot write to it and returns you the following error. There is not enough room in the file system |
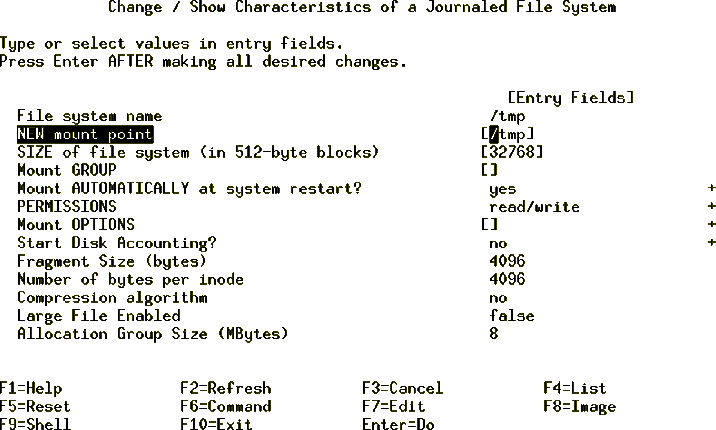
A file system can be increased by using the chfs command as shown in the following steps.
chfs -a size=<new size in 512-byte blocks> <file system name>
Filesystem size changed to <new size in 512-byte blocks>
To increase the file system size using the SMIT fast path command (smitty chjfs), do the following steps.
The fsck command checks file system consistency and interactively repairs the file system. The general syntax of the fsck command is as follows:
fsck [ -n ] [ -p ] [ -y ] [ -dBlockNumber ] [ -f ] [ -ii-NodeNumber ] [ -o Options ] [ -tFile ] [ -V VfsName ] [ FileSystem1 - FileSystem2 ... ]
The flags commonly used with the fsck command and their meanings
are shown in the following table.
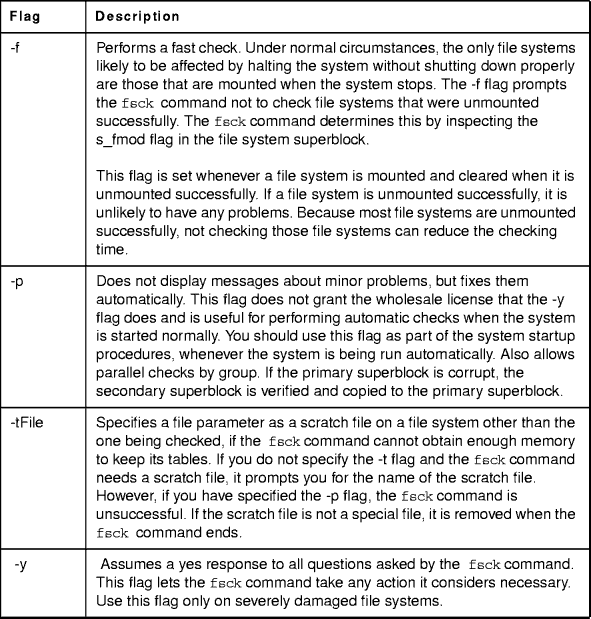
Table 11: fsck Command Flags
The fsck command checks and interactively repairs inconsistent file systems. You should run this command before mounting any file system. You must be able to read the device file on which the file system resides (for example, the /dev/hd0 device).
Normally, the file system is consistent and the fsck command merely reports on the number of files, used blocks, and free blocks in the file system. If the file system is inconsistent, the fsck command displays information about the inconsistencies found and prompts you for permission to repair them. If the file system cannot be repaired, restore it from backup.
Mounting an inconsistent file system may result in a system crash. If you do not specify a file system with the FileSystem parameter, the fsck command will check all the file systems with attribute check=TRUE in /etc/filesystems.
| Note |
|---|
|
By default, the /, /usr, /var, and /tmp file systems have the check attribute set to False (check=false) in their /etc/filesystem stanzas. The attribute is set to False for the following reasons:
|
The logform command initializes a logical volume for use as a JFS log device, which stores transactional information about file system metadata changes and can be used to roll back incomplete operations if the machine crashes. Following is the general syntax of the logform command.
logform LogName
| Note |
|---|
|
A file system log is a formatted list of file system transaction records. The log for this system is called the journaled file system (JFS) log and is used when the system goes down before the transactions have been completed. The JFS log ensures file system integrity, but not necessarily data integrity. A dedicated disk is created on hd8 for rootvg when the system is installed. The JFS log size is 4 MB. You can also create a JFS log on a separate disk for other volume groups, as shown in the following procedure.
In this example we will be using uservg as the volume group and userlv as the logical volume. First, determine the mounted file systems:
# mount
node      mounted     mounted over  vfs     date       options
------ -------------- -------------  ---- ----------- --------------
       /dev/hd4       /              jfs  Nov 16 18:45 rw,log=/dev/hd8
       /dev/hd2       /usr           jfs  Nov 16 18:45 rw,log=/dev/hd8
       /dev/hd9var    /var           jfs  Nov 16 18:45 rw,log=/dev/hd8
       /dev/hd3       /tmp           jfs  Nov 16 18:45 rw,log=/dev/hd8
       /dev/hd1       /home          jfs  Nov 16 18:46 rw,log=/dev/hd8
       /dev/userlv    /u             jfs  Nov 18 11:25 rw,log=/dev/loglv00
Notice that the log for the /userlv logical volume is the logical volume loglv00.
To check the loglv00 LV enter:
# lslv loglv00
LOGICAL VOLUME: loglv00             VOLUME GROUP: uservg
LV IDENTIFIER:  00091974342f2afa.2  PERMISSION:   read/write
VG STATE:       active/complete     LV STATE:     opened/syncd
TYPE:           jfslog              WRITE VERIFY: off
MAX LPs:        512                 PP SIZE:      8 megabyte(s)
COPIES:         1                   SCHED POLICY: parallel
LPs:            1                   PPs:          1
STALE PPs:      0                   BB POLICY:    relocatable
INTER-POLICY:   minimum             RELOCATABLE:  yes
INTRA-POLICY:   middle              UPPER BOUND:  32
MOUNT POINT:    N/A                 LABEL:        None
MIRROR WRITE CONSISTENCY: on
EACH LP COPY ON A SEPARATE PV ?: yes
Check the physical volumes (PVs) to look for a drive with no VG associated.
# lspv
hdisk0         000919746edab91f    rootvg
hdisk1         0009197459d92f2e    None
hdisk2         00091974d381d097    uservg
hdisk3         00091974d81ff431    uservg
hdisk4         00091974de731316    None
Notice that hdisk1 and hdisk4 have no VGs assigned to them. To extend the uservg volume group to incorporate hdisk4 type:
extendvg -f 'uservg' 'hdisk4'
To create the jfslog on hdisk4 enter:
smitty mklv
In Figure 88, select VOLUME
GROUP name. In this example it is uservg.
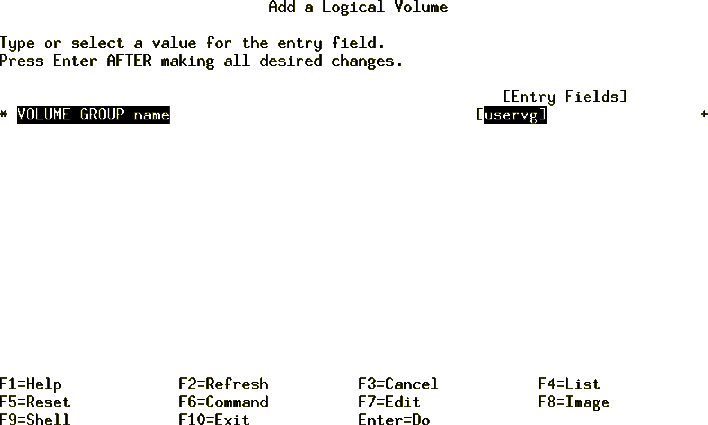
Figure 88: Add a Logical Volume Menu
From the Add a Logical Volume menu, select the following options:
as displayed in Figure 89.
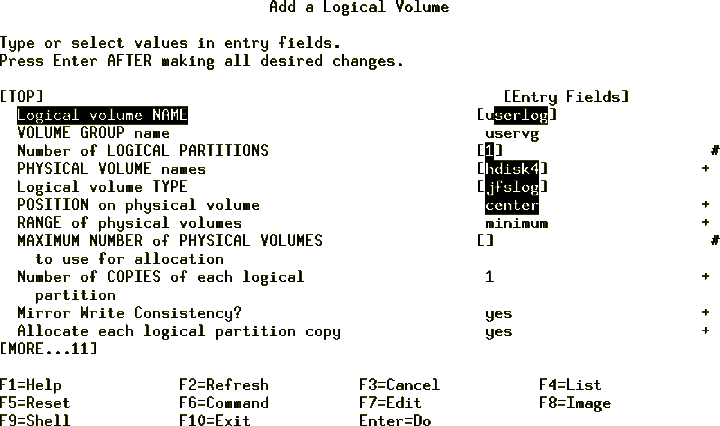
Figure 89: Add a Logical Volume Selection Menu
Once completed, the COMMAND STATUS screen will display confirmation as
displayed in Figure 90.
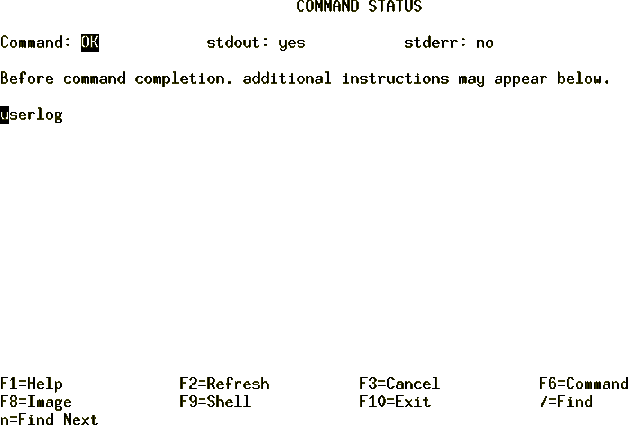
Figure 90: Add a Logical Volume Command Status
Press F10 and exit SMIT to the command line and enter the following:
# /usr/sbin/logform /dev/userlog
logform: destroy /dev/userlog (y)?y
| Note |
|---|
|
The preceding command formats the JFS-log logical volume so that it can record file-system transactions. Nothing is destroyed despite the wording in the prompt. |
Make sure the /userlv has been mounted by typing:
# mount
node      mounted     mounted over  vfs     date       options
------ -------------- -------------  ---- ----------- --------------
       /dev/hd4       /              jfs  Nov 16 18:45 rw,log=/dev/hd8
       /dev/hd2       /usr           jfs  Nov 16 18:45 rw,log=/dev/hd8
       /dev/hd9var    /var           jfs  Nov 16 18:45 rw,log=/dev/hd8
       /dev/hd3       /tmp           jfs  Nov 16 18:45 rw,log=/dev/hd8
       /dev/hd1       /home          jfs  Nov 16 18:46 rw,log=/dev/hd8
       /dev/userlv    /u             jfs  Nov 18 11:25 rw,log=/dev/userlog
Notice that the log is now userlog instead of loglv00.
To verify that you have set up the file system and log correctly, use the following command:
# lsvg -l uservg
uservg:
LV NAME          TYPE    LPs  PPs  PVs  LV STATE    MOUNT POINT
userlv           jfs     820  820  2    open/syncd  /u
userlog          jfslog  1    1    1    open/syncd  N/A#
There should be two logical volumes listed, as shown in the preceding example.

 5.6 Troubleshooting File
System Problems
5.6 Troubleshooting File
System Problems