

 5.1.1 Limitations of
Logical Volume Storage


 5.1.1 Limitations of
Logical Volume Storage
The following sections discuss adding a new disk drive, changing physical volume characteristics, and monitoring the physical volumes.
The following three methods can be used to configure a new disk drive. If the LVM will use this disk, it must also be made of a physical volume.
This method is used when it is possible to shut down and power off the system prior to attaching the disk.
When the system is booted after adding a disk drive, the cfgmgr command is run by the system during booting, which will automatically configure the disk. After boot-up is complete, log in as root and run lspv, and look for a new disk entry in the output as shown in the following example.
hdisk1 none none
hdisk1 00005264d21adb2e none
The 16-digit number in the second column of the preceding example is the physical volume identifier (PVID).
If the output shows the new disk with a PVID, it can be used by LVM for configuration. If the new disk does not have a PVID, then use the procedure 5.2.2 Making an Available Disk a Physical Volume to allow the disk to be used by the LVM.
This method may be used when it is not possible to shut down or power off the system prior to attaching the disk. Perform the following tasks.
# lspv
hdisk0       000005265ac63976    rootvg
cfgmgr
hdisk1 none none
or
hdisk1 00005264d21adb2e none
Once you have determined the name of the newly configured disk, use the procedure described in 5.2.2 Making an Available Disk a Physical Volume to allow the disk to be utilized by the Logical Volume Manager.
This method may be used when it is not possible to shut down or power off the system prior to attaching the disk. This method requires the following information about the new disk.
Use the following command to configure the disk and ensure that it is available as a physical volume by using the pv=yes attribute.
mkdev -c disk -s subclass -t type -p parentname \ -w whereconnected -a pv=yes
The pv=yes attribute makes the disk a physical volume and writes a boot record with a unique physical volume identifier onto the disk (if it does not already have one).
A new disk drive can only be assigned to volume groups. To be used by the LVM, a disk must be configured as a physical volume. The following command will change an available disk (hdisk1) to a physical volume by assigning a physical volume identifier (PVID) if it does not already have one.
chdev -l hdisk1 -a pv=yes
This command has no effect if the disk is already a physical volume.
This section discusses the two characteristics which can be changed for a physical volume to control the use of physical volumes using the chpv command.
The allocation permission for a physical volume determines if physical partitions contained on this disk, which are not allocated to a logical volume yet, can be allocated for use by logical volumes. Setting the allocation permission defines whether or not the allocation of new physical partitions is permitted for the specified physical volume.
The following command is used to turn off the allocation permission for physical volume hdisk1.
chpv -a n hdisk1
To turn the allocation permission back on, use the following command.
chpv -a y hdisk1
The availability of a physical volume defines whether any logical input/output operations can be performed to the specified physical volume. Physical volumes should be made unavailable when they are to be removed from the system or are lost due to failure.
The following command is used to set the state of a physical volume to unavailable.
chpv -v r pvname
This will quiesce all VGDA and VGSA copies on the physical volume, and the physical volume will not take part in future vary on quorum checking. Also, information about the specified volume will be removed from the VGDAs of the other physical volumes in that volume group.
The following command will make a physical volume available to the system. chpv -v a pvname
| Note |
|---|
|
The chpv command uses space in the /tmp directory to store information while it is executing. If it fails, it could be due to lack of space in the /tmp directory. Create more space in that directory and try again. |
The physical volume must be unconfigured before it can be removed from the system. The following example shows how to unconfigure a physical volume (hdisk1) and change its state from available to defined using the rmdev command.
rmdev -l hdisk1
The definition of this physical volume will remain in the ODM.
A physical volume correctly installed on the system can be assigned to a volume group and can subsequently be used to hold file systems and logical volumes.
The information about free physical partitions and their availability within different sectors on the disk can be very useful. The following section will discuss using the lspv command to obtain such information pertinent to physical volumes.
The lspv command executed without any flag will produce output that will identify the physical volumes by name that are known to the system as shown in the following example.
# lspv
hdisk0         00615147ce54a7ee    rootvg
hdisk1         00615147a877976a    rootvg
#
The lsdev command with option with the -C option and -c class will also list the physical volumes on the system along with the status of each physical volume as shown in the following example.
# lsdev -C -c disk
hdisk0 Available 40-58-00-0,0 16 Bit SCSI Disk Drive
hdisk1 Available 40-58-00-1,0 16 Bit SCSI Disk Drive
hdisk2 Available 20-68-L      SSA Logical Disk Drive
hdisk3 Available 20-68-L      SSA Logical Disk Drive
hdisk4 Available 20-68-L      SSA Logical Disk Drive
hdisk5 Available 20-68-L      SSA Logical Disk Drive
hdisk6 Available 20-68-L      SSA Logical Disk Drive
#
The following example shows the use of the lspv command to retrieve more detailed information about a physical volume.
# lspv hdisk1
PHYSICAL VOLUME:    hdisk1                   VOLUME GROUP:     rootvg
PV IDENTIFIER:      00615147a877976a         VG IDENTIFIER     00615147b27f2b40
PV STATE:           active
STALE PARTITIONS:   0                        ALLOCATABLE:      yes
PP SIZE:            4 megabyte(s)            LOGICAL VOLUMES:  13
TOTAL PPs:          238 (952 megabytes)      VG DESCRIPTORS:   1
FREE PPs:           71 (284 megabytes)
USED PPs:           167 (668 megabytes)
FREE DISTRIBUTION:  48..02..00..00..21
USED DISTRIBUTION:  00..46..47..47..27
#
The left hand pair of columns holds information about the physical volume itself. The right hand pair displays information concerning the volume group of which the physical volume is a member.
Following are the meanings of various fields in the preceding example.
The following example shows the lspv command with the -l option to list the physical volume hdisk1. The output shows the name of all the logical volumes on the physical volume, the number of physical and logical partitions allocated, the distribution across the physical volume, and the mount point, if it exists.
# lspv -l hdisk1
hdisk1:
LV NAME               LPs   PPs   DISTRIBUTION          MOUNT POINT
rawlv                 1     1     01..00..00..00..00    N/A
hd4                   2     2     02..00..00..00..00    /
hd9var                1     1     01..00..00..00..00    /var
hd3                   8     8     01..00..07..00..00    /tmp
lv06                  5     5     00..05..00..00..00    /home2
lv07                  13    13    00..13..00..00..00    /backfs
rawlv1                2     2     00..02..00..00..00    N/A
copied                2     2     00..02..00..00..00    N/A
newlv                 1     1     00..01..00..00..00    N/A
fslv00                1     1     00..01..00..00..00    N/A
hd6                   1     1     00..01..00..00..00    N/A
mytest                1     1     00..01..00..00..00    N/A
#
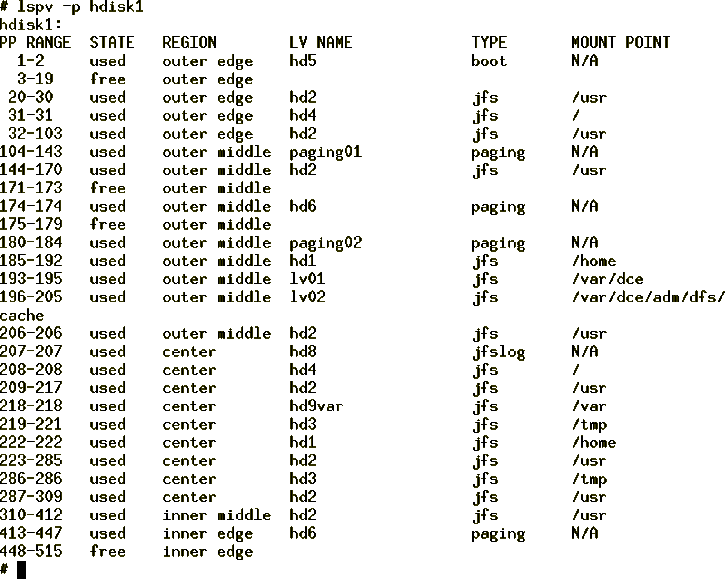
The example provided in Figure 32
shows how to retrieve more detailed information about the range of physical
partitions allocated to a logical volume and the region of disk used for those
partitions.

Figure 32: Status and Characteristics of hdisk1 by Physical
Partitions
The following is the description of the fields shown in the preceding example.
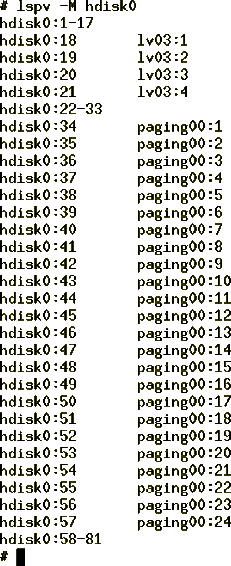
To determine the degree of contiguity of data on the
system in order to improve the I/O performance of a logical volume you can use
the lspv command with the -M option as shown in
Figure 33. You may decide to reorganize the system after
analyzing the output.

Figure 33: Physical Partition Allocation by Disk Region
The first column indicates the physical partition (if a group of contiguous partitions are free, it will indicate a range of partitions) for a particular hard disk. The second column indicates which logical partition of which logical volume is associated with that physical partition.
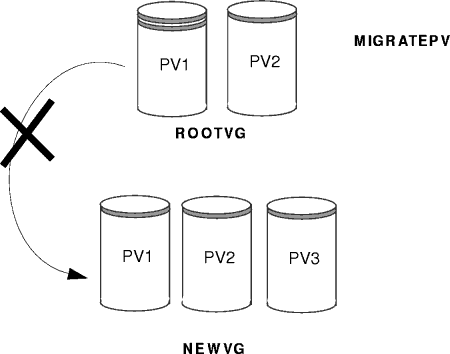
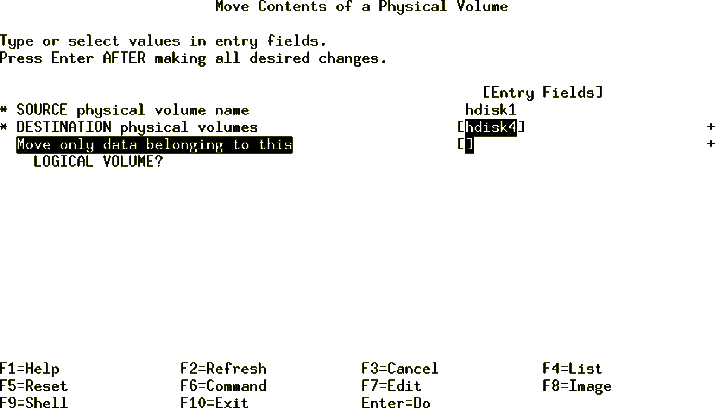
The physical partitions belonging to one or more specified logical volumes can be moved from one physical volume to one or more other physical volumes within a volume group using the migratepv command.
| Note |
|---|
|
The migratepv command cannot move data between different volume groups, as shown in Figure 34. |

The following procedure describes how to move the data from a failing disk before it is removed for repair or replacement.
# lsvg -p hdisk0
rootvg:
     PV_NAME    PV STATE   TOTAL PPs   FREE PPs   FREE DISTRIBUTION
     hdisk0     active     159         0          00..00..00..00..00
# lsdev -Cc disk
hdisk0  Available  00-08-00-30  670 MB  SCSI  Disk Drive
hdisk1  Available  00-08-00-20  857 MB  SCSI  Disk Drive
# lspv
hdisk0     0000078752249812   rootvg
hdisk1     000000234ac56e9e   none
extendvg VGName hdiskNumber
lspv SourceDiskNumber | grep "USED PPs"
The output will look similar to the following:
USED PPs: 159 (636 megabytes)
In this example, you would need 159 free PPs on the destination disk to successfully complete the migration.
lspv DestinationDiskNumber | grep "FREE PPs"
Add the free PPs from all of the destination disks. If the sum is larger than the number of USED PPs from step 3, you will have enough space for the migration.
Check to see if the boot logical volume (hd5) is on the source disk:
lspv -l SourceDiskNumber | grep hd5
If you get no output, the boot logical volume is not located on the source disk. Continue to step 5.
If you get output similar to the following:
hd5 2 2 02..00..00..00..00 /blv
then run the following command:
migratepv -l hd5 SourceDiskNumber DestinationDiskNumber
| Note |
|---|
|
Next, you will get a message warning you to perform the
bosboot command on the destination disk.
| Note |
|---|
|
When the boot logical volume is migrated from a physical volume, the boot record on the source should be cleared. Failure to clear this record may result in a system hang. When you execute the bosboot command, you must also execute mkboot -c. |
Execute the mkboot -c command to clear the boot record on the source. Do the following:
bosboot -a -d /dev/DestinationDiskNumber
then:
bootlist -m normal DestinationDiskNumber
then:
mkboot -c -d /dev/SourceDiskNumber

reducevg VGNname SourceDiskNumber
rmdev -l SourceDiskNumber -d
Following are a few more examples of using the migratepv command.
migratepv hdisk1 hdisk6 hdisk7
migratepv -l lv02 hdisk1 hdisk6