


 15.2.2 Changing Text
Using the vi Editor


 15.2.2 Changing Text
Using the vi Editor
The cat command is used to view an ASCII file and there are various commands available. The cat command concatenates or displays files. The cat command reads each file parameter in sequence and writes it to standard output. If you do not specify a file name, the cat command reads from standard input. You can also specify a file name of - (dash) for standard input.
| Note |
|---|
|
Do not redirect output to one of the input files using the redirection symbol, > (caret). If you do this, you lose the original data in the input file because the shell truncates the file before the cat command can read it. |
The cat command syntax is as follows:
cat [ -q ] [ -r ] [ -s ] [ -S ] [ -u ] [ -n [ -b ] ] [ -v [ -e ] [ -t ] ] [ - | File ... ]
Table 24 provides the flags that
can be used with the cat command.
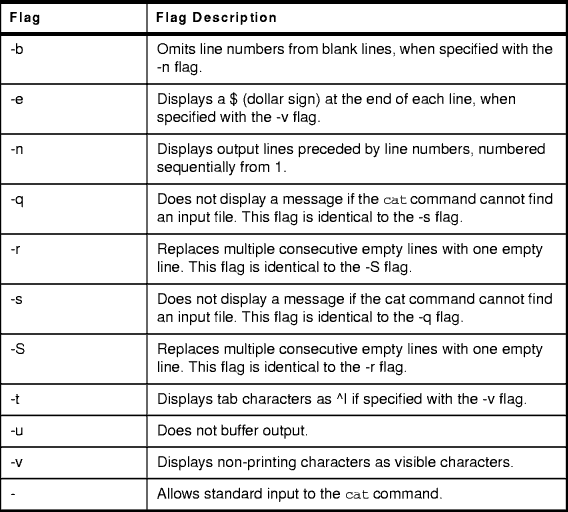
Table 24: The cat Command Flags and Flag Descriptions
Examples using the cat command are listed in the following:
cat /etc/hosts
This command displays the data in the /etc/hosts file. If the file is more than one less than the number of available display lines, some of the file scrolls off the screen. To list a file one page at a time, use the pg command.
# @(#)47        1.1  src/bos/usr/sbin/netstart/hosts, cmdnet, bos430, 9737A_430
7/24/91 10:00:46
# IBM_PROLOG_BEGIN_TAG
.......... (Lines Removed)
#  /etc/hosts
#
# This file contains the hostnames and their address for hosts in the
# network.  This file is used to resolve a hostname into an Internet
# address.
#
# At minimum, this file must contain the name and address for each
# device defined for TCP in your /etc/net file. It may also contain
# entries for well-known (reserved) names such as timeserver
# and printserver as well as any other host name and address.
#
# The format of this file is:
# Internet Address      Hostname        # Comments
# Items are separated by any number of blanks and/or tabs. A '#'
# indicates the beginning of a comment; characters up to the end of the
# line are not interpreted by routines which search this file. Blank
# lines are allowed.

# Internet Address  Hostname           # Comments
# 192.9.200.1       net0sample         # ethernet name/address
# 128.100.0.1       token0sample       # token ring name/address
# 10.2.0.2          x25sample          # x.25 name/address
127.0.0.1       loopback localhost # loopback (lo0)
19.33.1.12       yourhost yourhost.hometown.com
#
cat /etc/passwd /etc/hosts > yourfile
This command creates a file named yourfile that is a copy of /etc/passwd followed by /etc/hosts.
cat -q /etc/password
If you don't use the -q option you would get this error:
cat: 0652-050 Cannot open /etc/password.
cat /etc/filesystems >> yourfile
The >> (two carets) appends a copy of the file /etc/filesystems to the end of the file yourfile. If you want to replace the file, use the > (caret).
# cat >>yourfile
Create new user bob.
Ctrl-D
This command adds Create new user bob to the end of the file called yourfile. The cat command does not prompt; it waits for you to enter text. Press the Ctrl-D key sequence to indicate you are finished.
# cat /etc/passwd - /etc/hosts >yourfile
THIS IS THE SEPARATOR LINE
Ctrl-D
This command concatenates /etc/passwd, text from the keyboard - THIS IS THE SEPARATOR LINE (indicated by the minus sign), and /etc/hosts.
ls | cat /etc/passwd - >yournewfile
This command copies /etc/passwd, and then the output of the ls command to the file yournewfile.
Formats files to the display. The pg command reads a file name from the file parameter and writes the file to standard output one screen at a time. If you specify a - (dash) as the file parameter, or run the pg command without options, the pg command reads standard input. Each screen is followed by a prompt. If you press the Enter key, another page is displayed. Subcommands used with the pg command let you review or search in the file.
To determine workstation attributes, the pg command scans the file for the workstation type specified by the TERM environment variable. The default type is dumb.
The pg command syntax
pg [ -Number ] [ -c ] [ -e ] [ -f ] [ -n ] [ -p String ] [ -s ] [ +LineNumber ] [ +/Pattern/ ] [ File ... ]
Table 25 provides the flags that
can be used with the pg command.
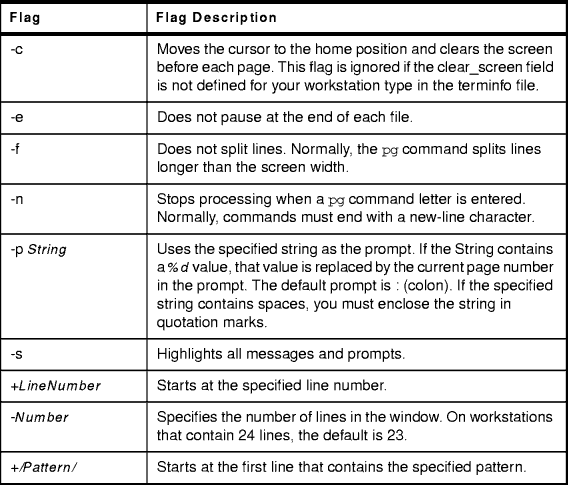
Table 25: The pg Command Flags and Flag Descriptions
When the pg command pauses and issues a prompt, you can issue a subcommand. Some of these subcommands change the display to a particular place in the file, some search for specific patterns in the text, and others change the environment in which the pg command works.
Table 26 provides a list of the subcommands for the
pg command.
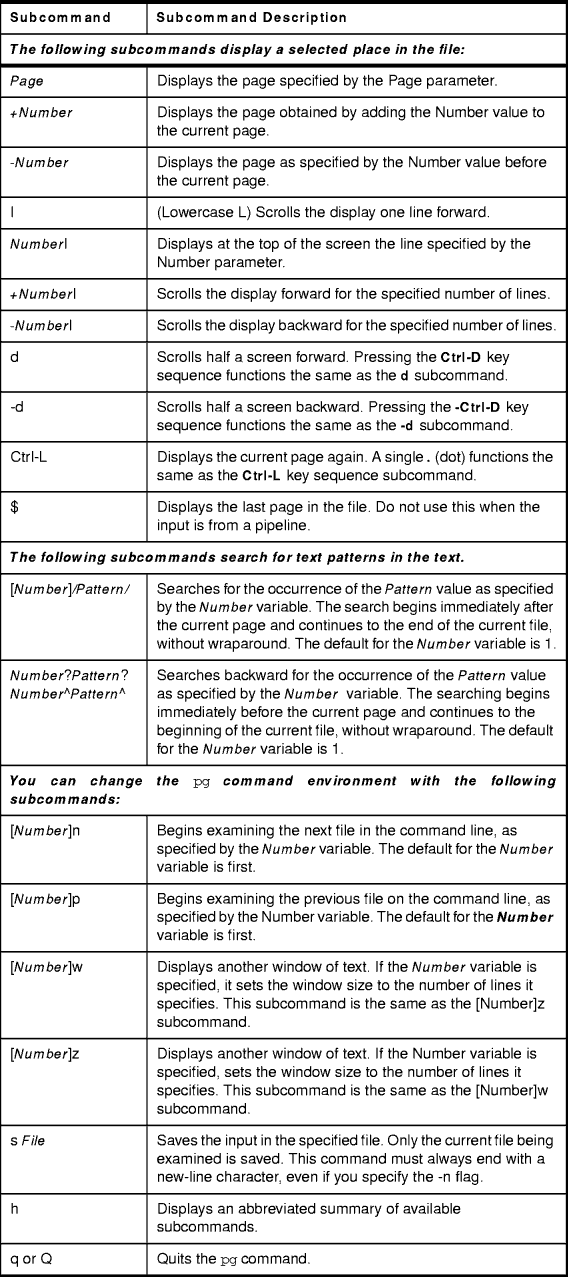
Table 26: pg Subcommands
Examples using the pg command are provided in the following:
# pg /etc/hosts
# @(#)47        1.1  src/bos/usr/sbin/netstart/hosts, cmdnet, bos430, 9737A_430
7/24/91 10:00:46
# IBM_PROLOG_BEGIN_TAG
.......... ( Lines Removed )
#  /etc/hosts
#
# This file contains the hostnames and their address for hosts in the
# indicates the beginning of a comment; characters up to the end of the
# line are not interpreted by routines which search this file. Blank
# lines are allowed.
.......... ( Lines Removed )
# Internet Address      Hostname        # Comments
# 192.9.200.1           net0sample      # ethernet name/address
# 128.100.0.1           token0sample    # token ring name/address
# 10.2.0.2              x25sample       # x.25 name/address
127.0.0.1               loopback localhost      # loopback (lo0) name/address
(EOF):
This is the end of the file. Press Enter to go back to the command prompt.
# pg -s /etc/hosts
Figure 125 shows the output of
the pg -s command. Notice the prompt (:) at the bottom of the
screen has been highlighted.
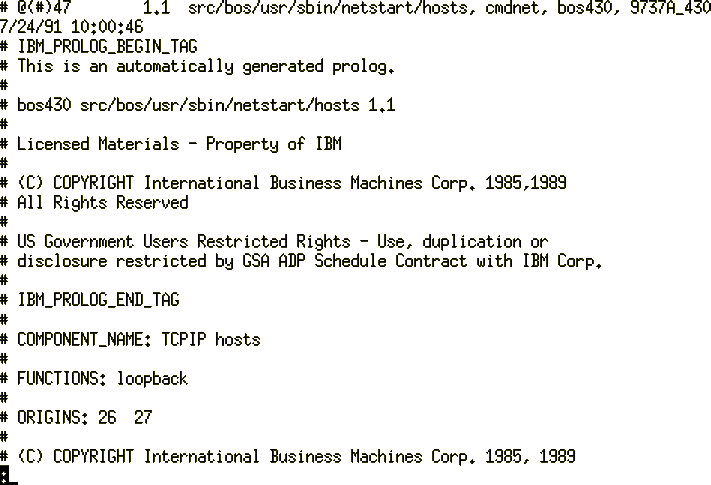
Figure 125: The pg -s Command with Highlighted Prompt
The view command starts the vi full-screen editor in read-only mode. The read-only mode is only advisory to prevent accidental changes to the file.
The view command syntax is as follows:
view [ -cSubcommand ] [ -l ] [ -t Tag ] [ -wNumber ] [ -y ] [ -r [ File ] ] [ + [ Subcommand ] ] [ File ... ]
Table 27 provides a list of the
flags for the view command.
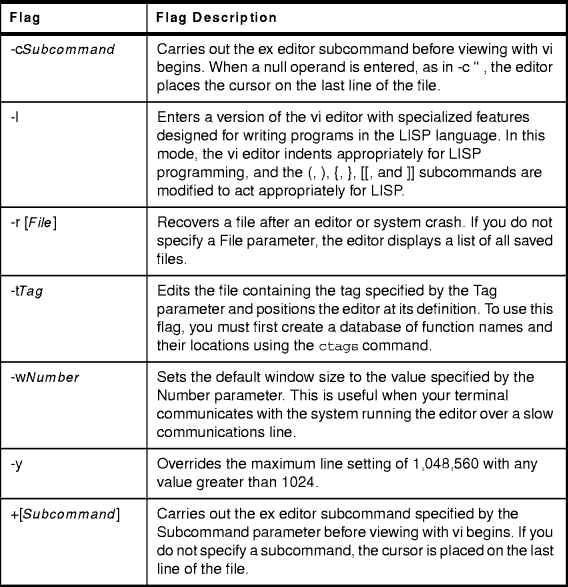
Table 27: Table of Flags for the view Command
Check 15.1 The vi File Editor to understand the vi editor.
The echo command writes character strings to standard output. Strings are separated by spaces, and a new-line character follows the last String parameter specified.
The echo command syntax is as follows:
echo [ String ... ]
The echo command recognizes the escape
conventions as shown in Figure 36:
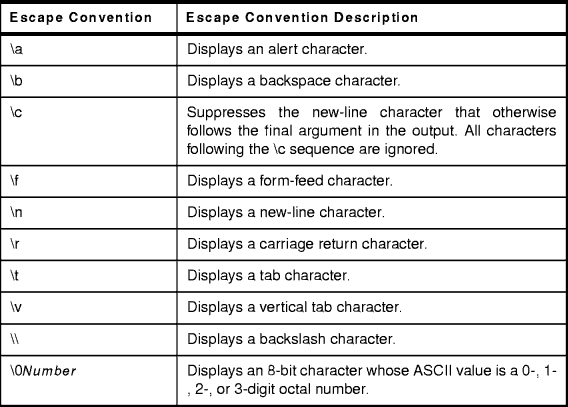
Table 28: Escape Conventions Used with the echo Command
Examples using the echo command are provided in the following:
# echo Please read your MAIL
Please read your MAIL
#
echo "\n\n\nGone to lunch.\nWill be back at 2:00.
This skips three lines and displays the message:
Gone to lunch.
Will be back at 2:00.
| Note |
|---|
|
You must put the message in " (quotation marks) if it contains escape sequences. Otherwise, the shell interprets the \ (backslash) as a metacharacter and treats the \ differently. |
echo The back-up files are: *.bak
This usage displays the message The back-up files are: followed by the file names in the current directory ending with .bak.
echo Remember to set the shell search path to $PATH. >>notes
This usage adds the message to the end of the file notes after the shell substitutes the value of the PATH shell variable.
echo Error: file already exists. >&2
This command redirects the error message to standard error. If the >&2 is omitted, the message is written to standard output.
The file command reads the files specified by the File parameter or the FileList variable, performs a series of tests on each file, and attempts to classify them by type. The command then writes the file types to standard output.
If a file appears to be in ASCII format, the file command examines the first 1024 bytes and determines the file type. If a file does not appear to be in ASCII format, the file command further attempts to distinguish a binary data file from a text file that contains extended characters.
If the File parameter specifies an executable or object module file and the version number is greater than 0, the file command displays the version stamp.
To classify the file type, use the following command syntax:
file [-m MagicFile] [-f FileList] [File...]
To check the magic file for Format Errors, use the following command syntax:
file-c [-m MagicFile]
Table 29 provides the flags that can be used by the
file command.
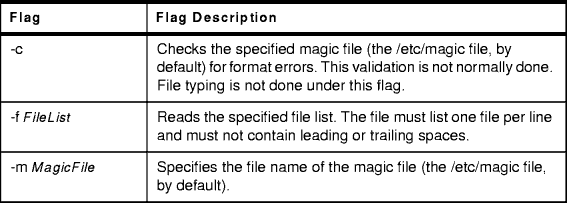
Table 29: The file Command Flags and Flag Descriptions
Examples using the file command are provided in the following:
# file /etc/hosts
/etc/hosts:     commands text
This displays the file type of myfile (such as directory, data, ASCII text, C-program source, and archive).
# cat filenames
/etc/hosts
/etc/wall
/usr/sbin/wall
# file -f filenames
/etc/hosts:     commands text
/etc/wall:      symbolic link to /usr/sbin/wall.
/usr/sbin/wall: executable (RISC System/6000) or object module
This displays the type of each file named in the filenames list. Each file name must appear alone on a line.
The strings command looks for printable strings in an object or binary file. A string is any sequence of 4 or more printable characters that end with a new-line or a null character. The strings command is useful for identifying random object files.
The strings command syntax is as follows:
strings [ -a ] [ - ] [ -o ] [ -t Format ] [ -n Number ] [ -Number ] [ File ... ]
Table 30 provides the flags that
can be used with the strings command.
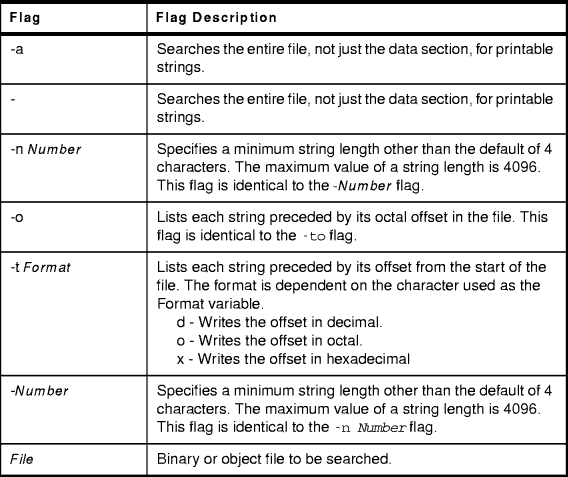
Table 30: The strings Command Flags and Flag Descriptions
| Note |
|---|
|
When the -o and the -t format flags are defined more than once on a command line, the last flag specified controls the behavior of the strings command. |
Examples using the strings command are as follows:
# strings wall
@(#)61
1.11  src/bos/usr/ccs/lib/libc/__threads_init.c, libcthrd, bos43K, 9823A_43K 6/12/98 12:37:06
wall.cat
/etc/utmp
libIN.cat
Cannot open "%s".
/etc/utmp
0123456789
/dev/
.......... ( Lines Removed )
libIN.cat
Error %d
libIN.cat
No system error
libc.cat
@(#)53
1.8  src/bos/usr/ccs/lib/libIN/ERsysmsg.c, libIN, bos430, 9737A_430 11/10/93 15:13:03
@(#)71
1.6  src/bos/usr/ccs/lib/libIN/CSlen.c, libIN, bos430, 9737A_430 6/10/91 10:14:51
@(#)88
1.6  src/bos/usr/ccs/lib/libIN/CSsname.c, libIN, bos430, 9737A_430 6/10/91 10:15:13
@(#)47
1.6  src/bos/usr/ccs/lib/libIN/CSskpa.c, libIN, bos430, 9737A_430 6/10/91 10:52:46
# strings -12 wall
1.11  src/bos/usr/ccs/lib/libc/__threads_init.c, libcthrd, bos43K, 9823A_43K 6/12/98 12:37:06
Cannot open "%s".
Cannot open "%s".
wall: Cannot allocate enough memory.
Broadcast message from %s@%s (%s) at %s ...
Message too long (max %d chars).
wall: Cannot create another process at this time.
@(#)11 1.16.1.7  src/bos/usr/sbin/wall/wall.c, cmdcomm, bos430, 9737A_430 9/5/97 13:48:32
1.7  src/bos/usr/ccs/lib/libIN/ERcmderr.c, libIN, bos430, 9737A_430 6/10/91 10:15:39
No system error
1.8  src/bos/usr/ccs/lib/libIN/ERsysmsg.c, libIN, bos430, 9737A_430 11/10/93 15:13:03
1.6  src/bos/usr/ccs/lib/libIN/CSlen.c, libIN, bos430, 9737A_430 6/10/91 10:14:51
1.6  src/bos/usr/ccs/lib/libIN/CSsname.c, libIN, bos430, 9737A_430 6/10/91 10:15:13
1.6  src/bos/usr/ccs/lib/libIN/CSskpa.c, libIN, bos430, 9737A_430 6/10/91 10:52:46
# strings -t x -n 20 wall
   1ac7 1.11  src/bos/usr/ccs/lib/libc/__threads_init.c, libcthrd, bos43K, 9823A_43K 6/12/98 12:37:06

   1bc0 wall: Cannot allocate enough memory.
   1bec Broadcast message from %s@%s (%s) at %s ...
   1c1c Message too long (max %d chars).
   1c40 wall: Cannot create another process at this time.
   1c74 @(#)11 1.16.1.7  src/bos/usr/sbin/wall/wall.c, cmdcomm, bos430, 9737A_430 9/5/97 13:48:32
   1ce7 1.7  src/bos/usr/ccs/lib/libIN/ERcmderr.c, libIN, bos430, 9737A_430 6/10/91 10:15:39
   1d87 1.8  src/bos/usr/ccs/lib/libIN/ERsysmsg.c, libIN, bos430, 9737A_430 11/10/93 15:13:03
   1de7 1.6  src/bos/usr/ccs/lib/libIN/CSlen.c, libIN, bos430, 9737A_430 6/10/91 10:14:51
   1e4b 1.6  src/bos/usr/ccs/lib/libIN/CSsname.c, libIN, bos430, 9737A_430 6/10/91 10:15:13
   1ea7 1.6  src/bos/usr/ccs/lib/libIN/CSskpa.c, libIN, bos430, 9737A_430 6/10/91 10:52:46
In this section you learned how to edit a file using the vi editor. You also learned how to view a file with the pg and cat commands and the differences between the two. You can echo text to the screen or a file. The file characteristics can be found using the file command. You can also find strings within a file using the strings command. A lot of what you have learned in this section will be used in Chapter 16. The Shell, and Shell Scripts.