


 7.2.1.8 Log Maintenance
Activities


 7.2.1.8 Log Maintenance
Activities
The system dump copies selected kernel structures to the dump device when an unexpected system halt occurs. The dump device can be configured dynamically to either a tape or a logical volume on the hard disk to store the system dump. A primary dump device is a dedicated dump device, while a secondary dump device is shared.
While installing an operating system, the dump device is automatically configured. By default, AIX Version 4 configures /dev/hd6 (paging logical volume) as the primary dump device and /dev/sysdumpnull as the secondary dump device. If the system was migrated from AIX Version 3, /dev/hd7 (the default dump device for AIX Version 3) will continue to be the default dump device for AIX Version 4.
The dump can either be system initiated or user initiated, as shown in
Figure 95. When the system dump completes, the system
either halts or reboots, depending upon the setting of the autorestart
attribute of sys0, which can be shown and altered using SMIT by selecting
System Environments, and then Change / Show Characteristics of
Operating System. The Automatically REBOOT system after a crash option
shows and sets the value of sys0 attribute.
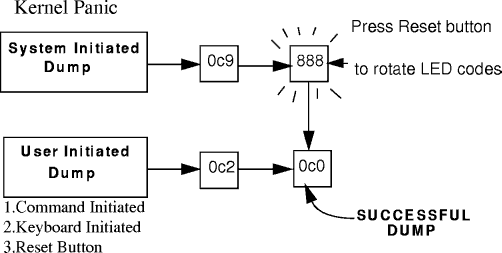
Figure 95: Successful System Dumps - LED Codes
The sysdumpdev command is used to dynamically configure the dump device as shown in the following examples.
# sysdumpdev -l
primary              /dev/hd6
secondary            /dev/sysdumpnull
copy directory       /var/adm/ras
forced copy flag     TRUE
always allow dump    FALSE
# sysdumpdev -P -p /dev/hd5
primary              /dev/hd5
secondary            /dev/sysdumpnull
copy directory       /var/adm/ras
forced copy flag     TRUE
always allow dump    FALSE
# sysdumpdev -e
0453-041 Estimated dump size in bytes: 18227200
# sysdumpdev -L
0453-019 No previous dumps recorded.
# sysdumpdev -L
0453-039

Device name:         /dev/hd6
Major device number: 10
Minor device number: 2
Size:                24202752 bytes
Date/Time:           Tue Nov 10 16:50:45 CST 1998
Dump status:         0
dump completed successfully
Dump copy filename: /var/adm/ras/vmcore.1
Alternatively, all the commands used in the preceding examples of this
section can be executed using the SMIT fastpath command by executing smit
dump, which will display the menu shown in Figure 96.
Then select the appropriate option from the menu to do the desired function.
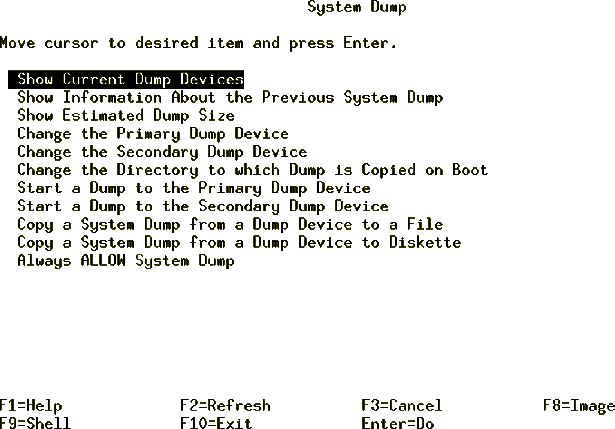
Figure 96: SMIT Dump Command
A system dump initiated by a kernel panic is written to the primary dump device.
A flashing 888 in a three digit hardware display indicates that a message is encoded as a string of three digit display values which can be read by pressing the reset button repeatedly and noting the changed three digit value every time until a flashing 888 is displayed again. Some RS/6000 systems use an advance button to perform this task.
An initial value of 102 after flashing 888 indicates an unexpected system
halt as shown in Figure 97. The value of mmm indicates the
cause of halt, crash code (see Table 12), and the value of
ddd indicates the dump status, and dump code (see
Table 13).
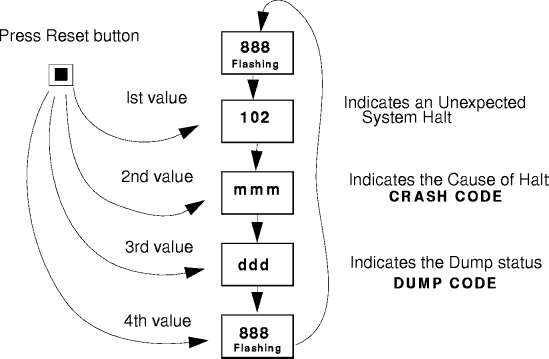
Figure 97: Unexpected System Halt - Three-Digit Display
String
The following table lists various crash codes. The 2xx
type codes describe a machine check are reporting hardware failure.
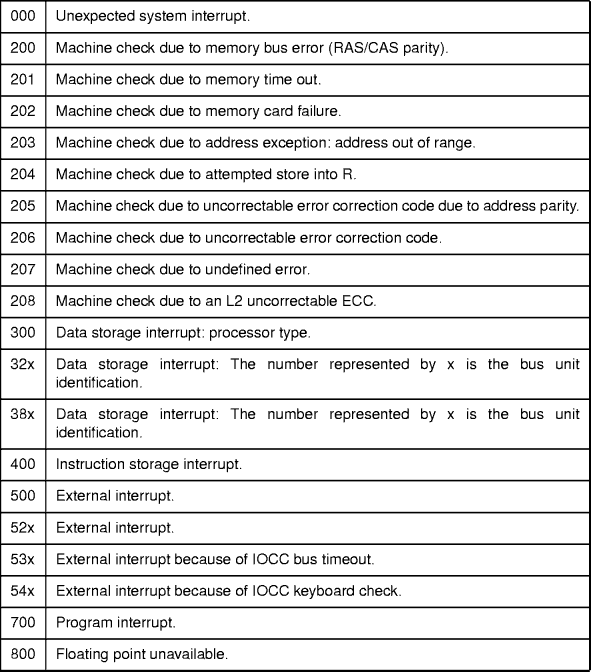
Table 12: Crash Codes
The following table lists various system dump codes.
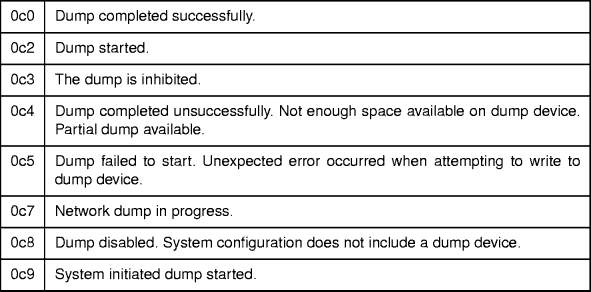
Table 13: System Dump Codes
There are three ways for a user to invoke a system dump depending upon the system condition as shown in Figure 98. The following sections discuss the steps involved in initiating a system dump, verifying the dump, copying the dump onto a tape, and sending it to Service Support Center for analysis.
The following command shows the estimated size of dump will be 20971520 bytes:
# sysdumpdev -e
0453-041 Estimated dump size in bytes: 20971520
The primary dump device, in this case, is the paging logical volume (/dev/hd6). To display its size, use lsps -a command as shown in the following example. If the reported free space is less than estimated dump size (reported in the preceding section), you should increase the dump device size. The following example shows the 128 MB of primary dump device with 6% used:
# lsps -a
Page Space  Physical Volume   Volume Group    Size   %Used  Active  Auto  Type
hd6         hdisk0            rootvg         128MB       6     yes   yes    lv
If you initiate the system dump from the command line, use the sysdumpstart command with a -p flag to write to the primary device or a -s flag to write to the secondary device.
If the dump is initiated using the special key sequences, use the sequence Ctrl-Alt-NumPad1 to write to the primary dump device and use the sequence Ctrl-Alt-NumPad2 to write to the secondary dump device.
If you initiate a system dump by pressing the reset button, the system dump
is written to the primary dump device.
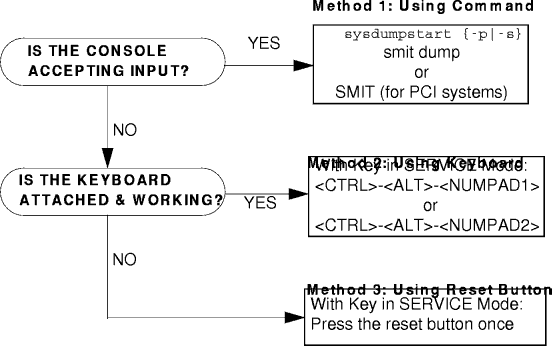
Figure 98: Method of User Initiated System Dump
The crash command is an interactive tool which is used to examine a system dump file. Checking that the dump is readable saves time by reducing callbacks from the support center.
To invoke the crash command on a system image file and kernel file, use the following command syntax:
crash SystemImageFile KernelFile
where SystemImageFile is either a file name or the name of the dump device and KernelFile is the default kernel /usr/lib/boot/unix.
The following example shows the commands to obtain the system dump file name (var/adm/ras/vmcore.1) and then uses the crash command on that dump file to verify the validity of dump.
# sysdumpdev -L
0453-039

Device name:         /dev/hd6
Major device number: 10
Minor device number: 2
Size:                24202752 bytes
Date/Time:           Tue Nov 10 16:50:45 CST 1998
Dump status:         0
dump completed successfully
Dump copy filename: /var/adm/ras/vmcore.1
#
# crash /var/adm/ras/vmcore.1
Using /unix as the default namelist file.
>
> stat
        sysname: AIX
        nodename: aix4xdev
        release: 3
        version: 4
        machine: 000044091C00
        time of crash: Tue Nov 10 16:50:45 CST 1998
        age of system: 1 day, 5 hr., 28 min.
        xmalloc debug: disabled
        abend code: 0
        csa: 0x0
>
> quit
#
If the crash command outputs the >, and the stat subcommand verifies the details of dump, the dump is successful. Any other output indicates the dump may not be successfully analyzed.
The snap command is used to gather configuration information of the system. It provides a convenient method of sending the lslpp and errpt output to the Service Support Center. It gathers the information and compresses the information to a tar file which can be downloaded to a tape or diskette or electronically transmitted.
The default directory for the output from the snap command is /tmp/ibmsupt. If you want to name an optional directory, use the -d option with the path of the desired output directory. Approximately 8 MB of temporary disk space is required when executing all of the snap command options. The cleanup option -r, should be used to remove the information saved by the snap command and to retrieve disk space.
Following are the commonly used options with snap command:
The following command copies the information on to tape device, rmt0:
/usr/sbin/snap -gfkD -o /dev/rmt0
Before executing the snap -c or snap -o commands, any additional information required by the Support Center should be copied to the /tmp/ibmsupt directory. For example, you may be asked by the Service Support Center to provide a test case that demonstrates the problem. The test case should be copied to the /tmp/ibmsupt directory. When the -c or -o option of the snap command is executed, the test case will be included.
| Note |
|---|
|
The snap -c and snap -o commands are mutually exclusive. Do not execute both during the same problem-determination session. The snap -c command should be used to transmit information electronically and the snap -o command should be used to transmit information on a removable output device. |
You can label the dump tape with the following information.