


 4.3 Displaying Installed
Devices
4.3 Displaying Installed
Devices
4.3 Displaying Installed
Devices
Depending on the kind of device you plan to configure, you will go through a different sequence of configuration steps. PCI device configuration and ISA device configuration differs considerably. The following sections discuss the various configuration approaches.
If you add a new PCI or SCSI device to your system, the system will automatically configure the device (provided no conflict is found in case of SCSI devices, for example the same SCSI ID for two different SCSI devices) at system restart or by using the cfgmgr command provided the required device drivers are installed.
When using PCI adapters, the slot number is as important as it is in microchannel devices. If you change the adapter from slot A to slot B, the original adapter information for slot A will be kept in defined state and a new definition will be created for slot B and a new device will be configured.
Devices like PCI or Micro Channel integrated devices such as SCSI controllers, integrated ISA devices like keyboard, mouse, and audio are self configuring. However non-integrated ISA devices such as adapters plugged into ISA slots, should be configured manually.
In the case of ISA devices, five resources should be managed before your system can run smoothly. These five resources are:
These settings must be different for all ISA adapters to avoid conflicts otherwise you will not be able to use the adapter. If these resources cannot be dynamically set, they must be set by adjusting switches or jumpers on the adapter. In case the adapter does not have switches, you may need a System Management Services (SMS) disk to configure the adapter.
The first step is to install the device drivers for ISA adapters if you have
not already done so. In order to check whether device support for ISA has been
installed, use the lsdev command as shown in
Figure 18:
# lsdev -Pc adapter -s isa adapter tokenring isa IBM 16/4 PowerPC Token-Ring Adapter (isa) adapter portmaster isa Multiport Model 2 Adapter adapter ethernet isa IBM ISA Ethernet Adapter adapter articmpx isa X.25 CoProcessor/1 Adapter adapter pcxr isa IBM 8-Port Async, EIA-232 (ISA) adapter pc8s isa IBM 8-Port EIA-232/RS-422A (ISA) Adapter adapter cxia isa IBM 128-Port Async, EIA-232 (ISA) |
This provides you with a list of all the adapters that have been defined in the predefined ODM database. If you see a blank display when you run this command you need to install the support for ISA adapters.
In order to install device support for ISA devices follow the SMIT fastpath:
ISA devices may not work properly if there are clashes in their settings suxh as IRQ or bus I/O ranges. It is best to note all the settings of any ISA devices already present in your system. In order to do that, issue the following command:
lsdev -Cc adapter -s isa
This command will show you all the ISA devices that are already configured
with your system. The output of this command will be similar to:

Figure 19: Finding Out Currently Defined Devices
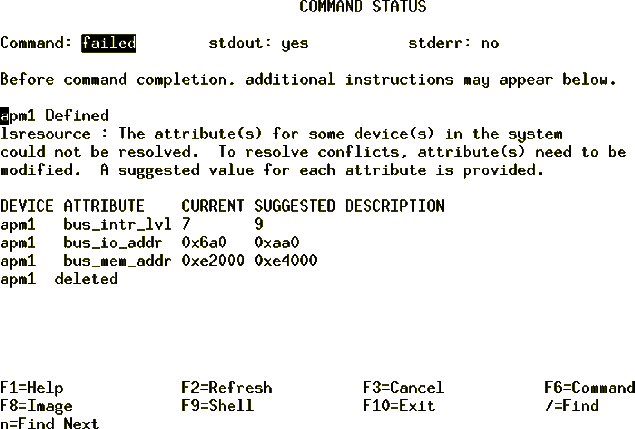
Once you have the names of the ISA devices that are configured on your system use either the lsresource command or the lsattr command to get the current settings of your ISA devices. The lsresource command writes a list of assigned bus resources to standard out, or determines if the bus resources for devices resolve. On the command line enter:
lsresource -l apm0
An output similar to Figure 20 will be shown:
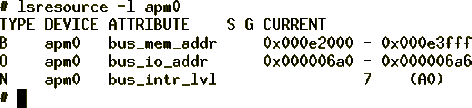
Figure 20: Finding Out Current Resource Settings Using
lsresource
Use lsattr command to find out the current settings of all of your
ISA devices. The lsattr command displays information about the
attributes of a given device or kind of device. Use the lsattr command
as shown in Figure 21.
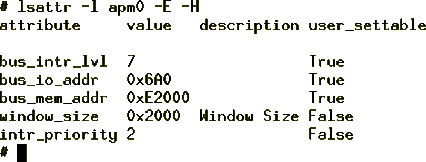
Figure 21: Finding Out Current Resource Settings Using
lsattr
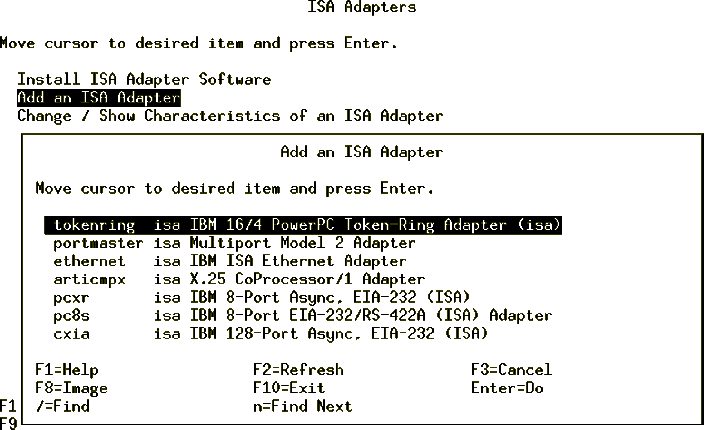
Once you have the current values for the installed devices, refer to your device documentation and select the recommended values for the device to work properly. Next configure the adapter using the SMIT fastpath:
A screen similar to Figure 22 will
be shown:
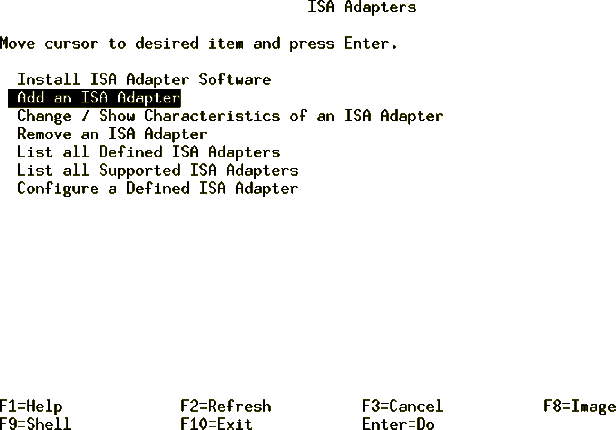
Figure 22: SMIT ISA Adapter Options
| Note |
|---|
|
You can try to configure the adapter without actually installing it since some adapters may have DIP switches that you may have to set in order to get the right settings. If you try to configure an adapter, for example an X.25 adapter that has not been installed, and there are no parameter conflicts you will be given a message as follows: ampx0 Defined Method error (/usr/lib/methods/cfgc1x): 0514-047 Cannot access a device. [busquery]ioctl(): Function not implemented ampx0 deleted This shows that you have configured the adapter correctly except that you still must actually install it. |

You have successfully configured an ISA adapter.
The 128-port asynchronous adapter subsystem meets the multiuser requirements for workstations in the open system environment. The subsystem can support up to 128 devices and offers higher speeds to the end user. It is an intelligent adapter with the ability to offload line protocol processing from the operating system.
The 128-port product consists of an adapter card, up to eight remote asynchronous node (RAN) units, each supporting 16 devices, for a total of 128 devices per adapter. The 128-port asynchronous adapter card resides in the system unit, and is connected by either EIA 422, direct cabling, EIA 422/EIA 232 synchronous modems, or Data Service Unit/Channel Service Units (DSU/CSUs) to the RAN. The number of 128-port asynchronous adapters that can be installed is dependent on the number of slots available in the system with a hardware limit of seven adapters per bus (an optional I/O bus can provide eight additional slots).
Each 128-port asynchronous adapter has two synchronous lines. Up to four RANs can be connected to a single synchronous line in daisy-chain fashion. That is, the first RAN is connected to one of the adapter's lines, the second RAN is connected to the first RAN, and so on (up to four RANs).
The RANs can be attached to the 128-port adapter with a direct local
connection, a synchronous modem connection, or a combination of the two.
Figure 26 shows some of the possible connection types.
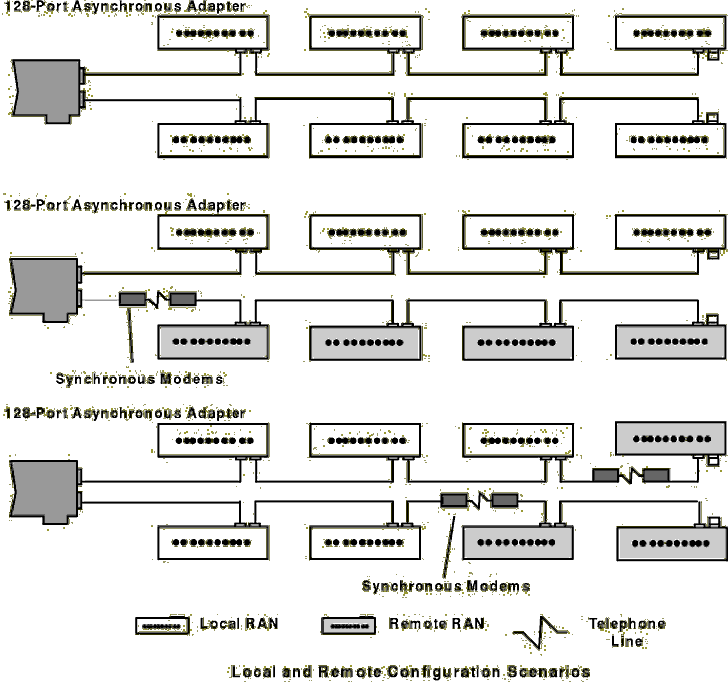
Figure 26: 128-Port Asynchronous Adapter Connection
Combinations
The adapter identifies RANs by
their node numbers. Each RAN in a daisy chain must have a unique node number
(1n through 4n), which must be set during installation. The node numbers must
be assigned in ascending order with the lowest number assigned to the RAN
closest to the adapter. You can skip node numbers (to facilitate insertion of
additional RANs at a later date), as long as the ascending sequence is
maintained. Figure 27 summarizes the node number
assignment.
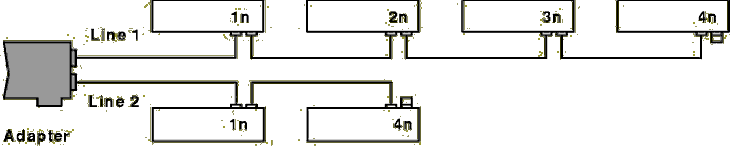
Figure 27: RAN Numbering
The remote asynchronous node (RAN) is equipped with:
The RAN front panel display has several different display modes as indicated
by the two-digit, seven-segment display. Some of the RAN front panel display
modes are shown in Table 3.
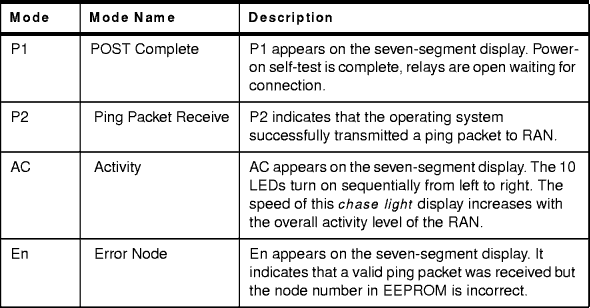
Table 3: RAN Activity Codes
In the case of duplicate node numbers, the RAN farthest from the host adapter will display En, instead of AC, when the system is started.
The configuration for a 128-port Asynchronous adapter follows the same sequence of steps for a normal ISA adapter; however, you can customize your adapter port-wise. That is, you can set different characteristics for your lines and the corresponding nodes.

 4.5 Adding a TTY
Device
4.5 Adding a TTY
Device