Archive for the HowTo category
What version of SSL/TLS does my openssl support?
Posted on Mon, Mar 23, 2026 at 10:39 by Hubertus A. Haniel
This one I always have to look up as I don't use openssl very often and some people say that this is the solution:
openssl ciphers -v | awk '{print $2}' | sort -u
This is not actually correct as the second column list the minimum version for a cipher. - The way you can get it from the command line is using the help section from s_client with something like:
openssl s_client -help 2>&1 > /dev/null | egrep "\-(ssl|tls)[^a-z]"
Now the client can also be used to explore a remote web server to see what versions it supports with:
openssl s_client -connect {domain}:443 -servername {domain} -tls{version}
Edited on: Mon, Mar 23, 2026 11:44Posted in HowTo (RSS), System - Linux (RSS)
Extracting a user keytab for krb5 authentication without passwords.
Posted on Thu, Mar 05, 2026 at 16:15 by Hubertus A. Haniel
WARNING - The keytab must be kept safe as it can be used as a key on other systems!
So the problem at hand is for users that do not authenticate against AD and use an SSH key for like an SFTP job or for applications that run in the background and the kerberos ticket expires they will no longer be able to access the NFS filesystem but I have the need to encrypt the filesystem. How can we keep them authenticated.
For this we use ktutil to create our own keytab (ktutil is like a shell):
Run ktutil to enter the shell
In the shell we run "addent -password -p <user>@<REALM> -k 2 -e aes256-cts-hmac-sha1-96 -f" which will prompt you for the user password.
The "-f" flag may not be required but it will make sure that the "salt" is the same as kinit will use.
We can use "list -e" to view the result and then write it to a file with "wkt <filename.keytab>"
With "q" we can gracefully exit ktutil.
You should now be able to do a "kinit -kt <path to above created keytab> <user>@<REALM>"
If that works the keytab can be placed as <user>.keytab in /var/lib/gssproxy/clients/ and gssproxy will attempt to use it when that UID accesses the filesystem. - ONLY root should be able to read that keytab!
On RHEL8 /etc/gssproxy/99-nfs-client.conf actually looks for the keytab as <numerical UID>.keytab in /var/lib/gssproxy/clients/.
Edited on: Fri, Mar 06, 2026 14:06Posted in HowTo (RSS), System - Linux (RSS)
Disk/Filesystem benchmarking
Posted on Tue, Dec 30, 2025 at 16:23 by Hubertus A. Haniel
Note to self at the moment until I have more details on what I am actually trying to prove:
To test performance on file systems I have used the following command:
fio --name=rand --rw=randrw --bs=4k --iodepth=32 --numjobs=16 --runtime=600 --time_based --size=1G --directory=/filesystem
iozone -Rac -b test.xls is also something I am experimenting it but don't really understand the output of that yet.
Another tool that has been around for a long time is bonnie++ but I am not sure if it is still maintained
Edited on: Tue, Dec 30, 2025 16:45
Posted in HowTo (RSS), System - Linux (RSS)
Encrypted NFS
Posted on Thu, Sep 04, 2025 at 17:04 by Hubertus A. Haniel
After joining AD we can use kerberos to encrypt nfs traffic as well - Obviously the NFS server must be joined to the same AD domain.
To this we need to add a SPN on the server side (already explained in the previously mentioned blog) to the NFS server nfs/<server name>
It needs to be visible in the keytab with klist -ke.
Then we add the export to the exports file womething like:
/TEST *.localnet.lan(rw,sec=krb5:krb5i:krb5p,no_root_squash)
We only really want krb5p as that is fully encrypted.
Then we need to set the domain in /etc/idmapd.conf - It should be returned when you run "nfsidmap -d" - In my case this is localnet.lan.
Most problems are about this SPN - so my SPN is nfs/server.localnet.lan but and the server name is the same but my kerberos realm is upnor.localnet.lan so I had to add this to my /etc/krb5.conf file that is mentioned in the other blog.
  [domain_realm]
  .localnet.lan = UPNOR.LOCALNET.LAN
  localnet.lan = UPNOR.LOCALNET.LAN
  .upnor.localnet.lan = UPNOR.LOCALNET.LAN
  upnor.localnet.lan = UPNOR.LOCALNET.LAN
I also added allow_weak_crypto - I am not sure it is required but in the
redhat manuals it does tell you to do that so for completeness my config
is now:
    includedir /etc/krb5.conf.d/

[logging]
    default = FILE:/var/log/krb5libs.log
    kdc = FILE:/var/log/krb5kdc.log
    admin_server = FILE:/var/log/kadmind.log

[libdefaults]
    dns_lookup_realm = false
    dns_lookup_kdc = false
    ticket_lifetime = 24h
    renew_lifetime = 7d
    forwardable = true
    rdns = false
    pkinit_anchors = FILE:/etc/pki/tls/certs/ca-bundle.crt
    spake_preauth_groups = edwards25519
    default_realm = UPNOR.LOCALNET.LAN
    default_ccache_name = KEYRING:persistent:%{uid}
    allow_weak_crypto = true

[realms]
  UPNOR.LOCALNET.LAN = {
  kdc = 192.168.0.10
  }

[domain_realm]
  .localnet.lan = UPNOR.LOCALNET.LAN
  localnet.lan = UPNOR.LOCALNET.LAN
  .upnor.localnet.lan = UPNOR.LOCALNET.LAN
  upnor.localnet.lan = UPNOR.LOCALNET.LAN
If we have done this all correctly we should be able to mount this export with something like "mount -t nfs -o nfsvers=4,sec=krb5p,proto=tcp" - We want krb5p as that fully encrypts all traffic while krb5 and krb5i only encrypt certain parts of the protocol which may be to insecure in some environments.
It should be noted that users have to have a kerberos ticket before they can read/write files on this mount and then the normal file permissions apply - However in an export the no_root_squash is actually irrelevant as root may be able to read stuff using the host credentials but root can not write to the file system as root can not get a kerberos ticket. There are workarounds to make that work but in general they are not recommended as they make your environment less secure again.
You may want to read my article about about ssh kerberos authentication and ticket delegation.
Some of the errors that can be encountered are very misleading. - For example I have come accross "an incorrect mount option was specified" - This had nothing to do with the mount options but can mean it is an error in the client configuration. - In my case the culprit was that rpc-gssd.service actually had died and I needed to manually start it.
You may notice that the no_root_squash option does not actually work with krb5. - There are various way to enable that but none are really recommended or even work as they will lower the security of your setup. RedHat have this article on that which would not work for me. - The ony way I was able to actually make that work with my setup is add the following to my realms section on the nfs server which will enable the client host linuxdev2 which will hold the host credential to be able to access shares as root (HOSTNAME$ is the actual computer account in AD and only root can use that to perform the initial mount):
 [realms]
  UPNOR.LOCALNET.LAN = {
  kdc = 192.168.0.10
  auth_to_local_names ={
       LINUXDEV2$ = root
    }
  }
There are articles that explain how you can create a a root account
kerberos realm but that then means that root will also have to
authenticate with a password to perform the mount and mounts can not be
performed during boot out of fstab
Posted in HowTo (RSS), System - Linux (RSS)
Enable krb5 authentication for SSH
Posted on Thu, Sep 04, 2025 at 14:49 by Hubertus A. Haniel
After joining an AD it is very simple to enable kerberos authentication for SSH assuming your Windows ID and Unix ID match. - All you need to do is add the following 2 lines to /etc/ssh/sshd_config
GSSAPIAuthentication yes
GSSAPIKeyExchange yes
All you then have to do is enable these options on your ssh client and you should be able to login to your Linux systems with the credentials on the windows machine joined to the same domain.
You may also have to turn things on the client side depending on what ssh client you use so on Linux you may need the following in your .ssh/config file or in the /etc/ssh/ssh_config file if you want all users to use kerberos:
GSSAPIAuthentication yes
GSSAPIDelegateCredentials yes
The delegate part is to enable kerberos ticket forwarding so when you log into the system your ticket gets passed along so you can read your encrypted NFS directories for example.
The delegation part is however also controlled by the system administrator so in Linux to enable this you have to add "forwardable = true" to /etc/krb5.conf in the libdefaults section.
On Windows the delegation part is controlled out of the Group Policy on the computer account for the machine.
It is important to understand that authenticatin with a kerberos ticket will not issue a ticket on the target machine it must be delegated during kerberos authentication and it will also not be delegated if you are using ssh keys or other forms of authentication.
A kerberos ticket can only be optained by authenticating against kerberos with a password. - On Windows this is done during login or when you unlock your screen with your password. On Linux the same may be enabled in pam with sssd or winbind authentication so you can get pam to pass your password through to the domain when authenticating. Obviously kinit is your last resort if these methods are not viable.
Edited on: Sat, Sep 20, 2025 14:51Posted in HowTo (RSS), System - Linux (RSS)
Linux AD integration and computer account password rotation pitfalls
Posted on Thu, Sep 04, 2025 at 14:31 by Hubertus A. Haniel
When running samba and/or trying to use kerberos for basic authentication and/or encryption and possibly running a samba server in most larger environments the most easy route is joining a Windows based AD domain which provides the central authentication for users already and it is reasonably trivial to do this with out having to stand up your own ldap/kerberos etc services.
I have already described here how adcli can be used to join a domain to enable kerberos but there may be some considerations to make when having samba running already on the server in which case it may already be joined to the domain anyway and if we want to add sssd to the mix because nscd is being deprecated and no longer present in RHEL10
I have come across articles with reports of issues with Computer Account Password rotation where samba or other parts may stop functioning when samba and sssd are running on the same machine where they will clash or not update all the correct files. Some threads even suggest that computer accounts could expire but it is my understanding that this is not actually the case by looking at Microsoft Documentation and also at the attributes for a computer object compared to a user object. The way computer account rotation is handled in Windows is via the Group Policy which has a definition of the maximum age before rotation (the default is 30 days). Windows will look at the pwdLastSet attribute of its account and rotate the password according to the group policy definition.
When using adcli to join a domain just to perform simple kerberos authentication and encryption there is really no concern when neither samba or sssd are running as nothing that would interfere with the credentials.
Samba obviously does not look at the group policy so the way it is handled in samba according to the man pages is with the "machine password timeout" parameter in smb.conf which apparently by default is 604800 seconds (1 week) - I have however observed in AD that RHEL8 machines do not seem to do this by default as I have found computer accounts that have not been rotated since they where joined into the domain - I have a couple of Debian based machines where both of them the password has been changed within the last week which is the expected behavior from the man page. I also have very little concern that samba will break basic kerberos authentication and encryption since samba should update all the correct files.
So on a samba machine if I force the update with "net ads changetrustpw" - I can see that it does correctly update the local secrets database in /var/lib/samba and /etc/krb5.keytab file. After that running "adcli testjoin" or "net ads testjoin" both report positively that everything is still OK. However running "adcli update" will actually break samba as it will only update /etc/krb5.keytab so "net ads testjoin" will now report everything is OK but it will also throw up errors like "kerberos_kinit_password VM-RHEL8$@UPNOR.LOCALNET.LAN failed: Preauthentication failed". It gets worse when I try to use other commands like "net ads changetrustpw" again which is actually completely broken now. I will have to rejoin the domain with samba as samba and kerberos have come out of sync. If samba is running we need to make sure that the data that samba keeps in /var/lib/samba and /etc/krb5.keytab are in sync so adcli has to be run with the --add-samba-data flag. I also recommend running with the "-v --computer-password-lifetime=0" as adcli may actually do nothing if it thinks the password is not out of date and you will not see that without "-v" flag.
I yet have to dig into how sssd will interact with this mix which is on my todo list but I have a suspicion if sssd is in the mix it will not take care of the stuff in /var/lib/samba and this is where the various articles across various forums emerge from. - They suggest to prevent the clash is to do the following:
- add "ad_maximum_machine_account_password_age = 0" to /etc/sssd/sssd.conf (Needs to be tested as I can not find that setting in the man pages even on RHEL10 and another article suggests that this setting is upstream from RHEL8)
- add "machine password timeout = 0" to /etc/samba/smb.conf
- Create a cron job that runs something like "adcli update --computer-password-lifetime=0 --add-samba-data -D 2>&1 | /usr/bin/logger -t adcli"
One note of caution - If you do end up having to rejoin your domain it is very likely that any SPN's you may have will get destroyed and stop working so it is advisable to remove /etc/krb5..keytab and start from scratch.
Edited on: Sat, Sep 20, 2025 14:01Posted in HowTo (RSS), System - Linux (RSS)
Managing AD Computer Accounts with adcli and kerberos on Linux
Posted on Mon, Jun 02, 2025 at 12:12 by Hubertus A. Haniel
When configuring Samba on Linux against active directory these steps are part of this as well but you may just want to use kerberos on its own so these are the initial streps to get it working on RHEL8/9
First you need to install the krb5-workstation and adcli packages which should be available in the default repos.
Then you need to configure /etc/krb5.conf to reflect your AD domain (mine is upnor.localnet.lan)
 includedir /etc/krb5.conf.d/

[logging]
    default = FILE:/var/log/krb5libs.log
    kdc = FILE:/var/log/krb5kdc.log
    admin_server = FILE:/var/log/kadmind.log

[libdefaults]
    dns_lookup_realm = false
    dns_lookup_kdc = false
    ticket_lifetime = 24h
    renew_lifetime = 7d
    forwardable = true
    rdns = false
    pkinit_anchors = FILE:/etc/pki/tls/certs/ca-bundle.crt
    spake_preauth_groups = edwards25519
    default_realm = UPNOR.LOCALNET.LAN
    default_ccache_name = KEYRING:persistent:%{uid}

[realms]
  UPNOR.LOCALNET.LAN = {
  kdc = 192.168.0.10
  }
Now we need to join the domain and for this the command is something like:
adcli join -v --domain "upnor.localnet.lan" -U <userid> -O OU=Unix\ Samba\ Servers,OU=SERVERS,DC=upnor,DC=localnet,DC=lan
Note that the OU stuff seems back to front to what it shows in the Windows Active Directory GUI where my OU or path is "\SERVERS\Unix Samba Servers" and you obviously have to escape the spaces with \ - The userid needs to be somebody that has the rights to manage computer accounts in that OU. - This has to be run as root.
The command will create the computer account and the /etc/krb5.keytab file.
You should now be able to get a kerberos ticket with "kinit <userid>"
Now we are in a position to run other commands and we can authenticate against AD with the kerberos ticket (-C option)
So we can for example create a SPN for our host (again as root as /etc/krb5.keytab will get modified)
adcli update --add-service-principal=cifs/alias.upnor.localnet.lan --domain "upnor.localnet.lan" -v -C
alias.localnet.lan is an alias to my server running samba and we may need this to authenticate against samba on this server using this alias. - All these commands I have run in verbose mode (-v) as with this command I noticed that while adding an SPN where the update in AD failed but it still carried on updating the local keytab file.
We should be able to query the SPN from a windows client using "setspn -T upnor.localnet.lan -Q */alias.upnor.localnet.lan"
We can also pre-set a computer account for another server that may not have adcli installed but we want to join the domain using samba with "net ads join -U <userid>" because samba for some reason does not create computer accounts and certainly can not create them in a specific OU:
adcli preset-computer <other server name> -domain "upnor.localnet.lan" -U <userid> -O OU=Unix\ Samba\ Servers,OU=SERVERS,DC=upnor,DC=localnet,DC=lan -v -C
The only bit I can not figure out is how to edit the SPN's for a remote
host like you can with setspn in windows - I have, without success,
tried various combinations to archive the same as:
 setspn -S http/daserver daserver1
   It will register SPN "http/daserver" for computer "daserver1"
    if no such SPN exists in the domain
 setspn -D http/daserver daserver1
   It will delete SPN "http/daserver" for computer "daserver1"
If you work it out - let me know and I will add it here!
Edited on: Mon, Jun 02, 2025 13:30Posted in HowTo (RSS), System - Linux (RSS), System - Windows (RSS)
Version comparison using rpm
Posted on Thu, Feb 20, 2025 at 11:35 by Hubertus A. Haniel
I have been playing a little bit with ChatGPT and its code generators and while doing this I stumbled across this. I wrote about versiion comparison in a previos post which is sort of a common thing that keeps coming up and I have used the function that I refer to there lots of times. It seems that rpm actually has a build in function to do this which returns result codes so you can refer to this with a function like this but obviously it will not work on other platforms and it seems that this has not been available on all rpm versions but I do not know when it was introduced:
compare_rpm_versions() {
    local version1="$1"
    local version2="$2"

    if [[ -z "$version1" || -z "$version2" ]]; then
        printf "Error: Two versions must be provided\n" >&2
        return 1
    fi

    if ! command -v rpm &>/dev/null; then
        printf "Error: rpm command not found\n" >&2
        return 2
    fi

    if rpm --eval "%{lua: print(rpm.vercmp('$version1', '$version2'))}" &>/dev/null; then
        local result; result=$(rpm --eval "%{lua: print(rpm.vercmp('$version1', '$version2'))}")
        case "$result" in
            1)  printf "%s is newer than %s\n" "$version1" "$version2"; return 0 ;;
            0)  printf "%s and %s are identical\n" "$version1" "$version2"; return 0 ;;
            -1) printf "%s is older than %s\n" "$version1" "$version2"; return 0 ;;
            *)  printf "Error: Unexpected comparison result: %s\n" "$result" >&2; return 3 ;;
        esac
    else
        printf "Error: Failed to compare versions\n" >&2
        return 4
    fi
}
Edited on: Wed, Jun 04, 2025 15:00Posted in HowTo (RSS), Packaging (RPM) (RSS), Shell Scripting (RSS), System - Linux (RSS)
Large File System out of lots of small chunks of free space.....
Posted on Thu, Dec 05, 2024 at 10:03 by Hubertus A. Haniel
DON'T TRY THIS AT WORK!
Just because it is possible it does
not mean it is good practice!
I would not endorse this
trickery/hack in a commercial environment.
This would not be supported in an enterprise environment and is probably not the safest way of keeping your data so I would not recommend this in a critical environment with critical data. On top of this not being the safest way to store your data it will also not be very efficient and I would expect a performance impact as a result of this. So this is just a bit of fun and may just help you out with a temporary fix to get you over a hurdle. I have done this on RHEL9 but it will work in the same way on other Linux distributions
Lets say you have a system with lots of file systems of which the size does not really matter but there are a few gigabytes here and there and you may even be able to add NFS mounted stuff although if there is a network failure you may end up with corruptions when the NFS parts fail. You can not shrink or rearrange the file systems to free up enough to store a larger file. In this example:
/filesystem-01
/filesystem-02
/filesystem-03
/filesystem-04
It is irrelevant of how big these file systems are but let say each of these have only about 25gb free but you want to create a file that is in the region of 80gb to 100gb for what ever reason. So lets go ahead and in each of these file systems we will create a sparse file (We can just create a full size file but a sparse file is faster to create. You will find that after that step the real space is not actually being used yet but with ls -al you will see the file size is shown as what it could grow to.)
dd if=/dev/zero of=/filesystem-01/filestore.img bs=1 count=0 seek=25G
dd if=/dev/zero of=/filesystem-02/filestore.img bs=1 count=0 seek=25G
dd if=/dev/zero of=/filesystem-03/filestore.img bs=1 count=0 seek=25G
dd if=/dev/zero of=/filesystem-04/filestore.img bs=1 count=0 seek=25G
Next we will create loop back devices that point to these files:
losetup --show -f /filesystem-01/filestore.img
losetup --show -f /filesystem-02/filestore.img
losetup --show -f /filesystem-03/filestore.img
losetup --show -f /filesystem-04/filestore.img
These will most likely end up being /dev/loop0 through to /dev/loop3 but if you have other loop back stuff mounted it may differ. The command "losetup -a" will list them for you.
We can now create a raid device on top of these loop devices with level raid 0 to have on continuous device:
mdadm -C /dev/md/filestore -l 0 -n 4 /dev/loop0 /dev/loop1 /dev/loop2 /dev/loop3
You can now treat /dev/md/filestore like a normal disk device. So you can partition it create one large filesystem on it.
When you want to unmount it (before rebooting for example although Linux may do it for you the steps are:
- Unmount the file system
- Stop the raid device ("mdadm --stop /dev/md/filestore"
- Remove the loop devices ("losetup -d <for each device created>")
To remount the device again the steps are:
- "losetup --show -f" for each of the image files as above
- "mdadm --assemble /dev/md/filestore /dev/loop0 /dev/loop1 /dev/loop2 /dev/loop3"
- mount the device as previously
If you are going to keep this setup for a longer time you may want to script the above to ensure it gets done on boot etc. - The same is probably archievable just with plain LVM but I have not attempted that and I suspect it may be more intrusive as you may have to modify lvm.conf to scan the loop devices. You also run in the danger of messing up your lvm meta data so I did not want to take the risk on creating volume groups on files that are already on top of a volume group which is the case on my system. You also would not want to extend existing logical volumes on to files bearing in mind that you may not be able to shrink stuff down when you want to remove it again.
Edited on: Thu, Dec 05, 2024 13:42Posted in HowTo (RSS), System - Linux (RSS)
AIX 7.1 to 7.2 upgrade
Posted on Wed, Mar 13, 2024 at 15:23 by Hubertus A. Haniel
Note: This guide is not aimed as a step by step command reference as systems may be configured in different way - It is more of a reminder of the steps that are involved and it is still a work in progress guide.
One should familiarize themselves with the following articles:
The assumption is that we are working on an AIX server where rootvg is mirrored across hdisk0 and hdisk1. Just to ensure that the boot partitions are up to date it is advisable to execute "bosboot -ad /dev/hdisk0" and the same for hdisk1.
It should be ensured that we have an up to date mksysb or we should create one preferably on a NIM server that we can boot of and recover this image.
We will now have to break the rootvg mirror using "unmirrorvg rootvg hdisk1" which will now free up hdisk1.
Now we can use "alt_disk_copy -d hdisk1" to create an alternative rootdisk copy which is NOT a mirror but a copy in itself. - This will create a copy and set hdisk1 as a bootdisk.
After the copy has completed we can reboot the server and we should now see that hdisk1 has become the active rootvg and hdisk0 is in a volume group called old_rootvg.
While running on this rootvg copy we should upgrade any components that may need to be upgraded as a pre requisite to AIX 7.2 eg Veritas Filesystems if they are in use.
To do the migration to 7.2 we need to boot of the 7.2 boot media from NIM or CD/DVD and the NIM server may need to be prepped for that by adding the NIM client for a bos_install.
Once we are successfully booting of the media (remember the LED lights so you can see the process) we should be prompted on the console to press 1 to recognise that we are on the correct console. We may also be prompted for a language selection.
We should then be dropped into the install menu which by default should have chosen "Migration" rather then "Full install" - This can be checked in the advanced install configuration menu and one should also make sure that the correct disk is selected which in our case should be hdisk1 but the default may go for hdisk0 which we do not want to touch.
After the migration the server should then boot into AIX 7.2 on hdisk1 and once we have confirmed that everything is OK we can remove old_rootvg and fully remirror the disks not forgetting bosboot on all mirrors to make sure the boot sector is populated.
Edited on: Wed, Mar 13, 2024 15:55Posted in HowTo (RSS), System - AIX (RSS)
SSH troubleshooting
Posted on Fri, Feb 16, 2024 at 11:40 by Hubertus A. Haniel
When SSH issues are reported it is all to tempting to jump on a box make changes to the config file to fix the suspected issues and restarting sshd.
This may not always be the best way because:
- Error messages in syslog may be misleading as it is difficult to track down an individual session and debug messages may be filtered out in syslog
- On a busy system other users that still work may get disconnected/locked out while the problem is being worked on
- In the worst case you will get disconnected and will not get back into the system other than via the console
The way to avoid this is to start ssh with the "-d" option which will start sshd in debugging mode and it will listen for one session only. If required multiple -dd (up to three) can be specified to increase the debugging level. Obviously the running ssh session is already listening on port 22 so we do not interfere with that so we need to specify a different port to listen on that is not in use with the -p option. For security reasons build into sshd you must run sshd with the full path of where it is installed.
# /usr/sbin/sshd -ddd -p 2222
debug2: load_server_config: filename /etc/ssh/sshd_config
debug2: load_server_config: done config len = 595
debug2: parse_server_config: config /etc/ssh/sshd_config len 595
debug3: /etc/ssh/sshd_config:21 setting Protocol 2
debug3: /etc/ssh/sshd_config:36 setting SyslogFacility AUTHPRIV
debug3: /etc/ssh/sshd_config:66 setting PasswordAuthentication yes
debug3: /etc/ssh/sshd_config:70 setting ChallengeResponseAuthentication no
debug3: /etc/ssh/sshd_config:80 setting GSSAPIAuthentication yes
debug3: /etc/ssh/sshd_config:82 setting GSSAPICleanupCredentials yes
debug3: /etc/ssh/sshd_config:96 setting UsePAM yes
debug3: /etc/ssh/sshd_config:99 setting AcceptEnv LANG LC_CTYPE LC_NUMERIC LC_TIME LC_COLLATE LC_MONETARY LC_MESSAGES
debug3: /etc/ssh/sshd_config:100 setting AcceptEnv LC_PAPER LC_NAME LC_ADDRESS LC_TELEPHONE LC_MEASUREMENT
debug3: /etc/ssh/sshd_config:101 setting AcceptEnv LC_IDENTIFICATION LC_ALL LANGUAGE
debug3: /etc/ssh/sshd_config:102 setting AcceptEnv XMODIFIERS
debug3: /etc/ssh/sshd_config:108 setting X11Forwarding yes
debug3: /etc/ssh/sshd_config:131 setting Subsystem sftp /usr/libexec/openssh/sftp-server
debug3: /etc/ssh/sshd_config:138 setting PermitRootLogin without-password
debug1: sshd version OpenSSH_5.3p1
debug3: Not a RSA1 key file /etc/ssh/ssh_host_rsa_key.
debug1: read PEM private key done: type RSA
debug1: private host key: #0 type 1 RSA
debug3: Not a RSA1 key file /etc/ssh/ssh_host_dsa_key.
debug1: read PEM private key done: type DSA
debug1: private host key: #1 type 2 DSA
debug1: rexec_argv[0]='/usr/sbin/sshd'
debug1: rexec_argv[1]='-ddd'
debug1: rexec_argv[2]='-p'
debug1: rexec_argv[3]='2222'
debug2: fd 3 setting O_NONBLOCK
debug1: Bind to port 2222 on 0.0.0.0.
Server listening on 0.0.0.0 port 2222.
debug2: fd 4 setting O_NONBLOCK
debug1: Bind to port 2222 on ::.
Server listening on :: port 2222.
Now the user can connect to that port with something like "ssh -p 2222 user@host" which will then give us detailed information of what is happening with that connection.
To make changes to the config file and to debug/test these changes it is best to make a copy of the existing config file and edit this file instead so we copy the config with something like:
# cp -a /etc/ssh/sshd_config /etc/ssh/sshd_config.TEST
Then we can start a session using this config file with:
# /usr/sbin/sshd -ddd -p 2222 -f /etc/ssh/sshd_config.TEST
debug2: load_server_config: filename /etc/ssh/sshd_config.TEST
Once confident that our changes are safe and they will not break anything else we can copy the changes to the real config file and restart the main ssh daemon on the system.
Edited on: Fri, Feb 16, 2024 12:36Posted in HowTo (RSS), System - AIX (RSS), System - Linux (RSS), System - Solaris (RSS)
How to recover the hscroot password on an HMC
Posted on Sat, Dec 02, 2023 at 15:01 by Hubertus A. Haniel
We recently where locked out of an old HMC that is no longer supported but had problems with an LPAR attached to it which we are trying to get rid off so IBM where not very helpful to get us into it so I found the below procedure somewhere on the internet and now tested it on V7R7.9.0 before I will do on the real system by installing the HMC code on a VMware system - for that some hacks that are described at http://omnitech.net/reference/2013/05/01/installing-hmc-in-virtualbox/ where necessary I have lost the link to the procedure below so I am putting it here in case somebody else needs it. I did not actually have to follow the full procedure as init=/bin/rcpwsh prompted me to change the hscroot password rather than dropping me into a shell and then continued to fully boot at which stage I could just could log straight back in.
Anybody familiar with Linux will probably be familar with this procedure as it works on most linux distributions with init=/bin/bash. In case of the HMC I just was not sure how locked down these devices where and would I be challanged with encrypted filesystems and stuff like that....
Here we go:
1) Power off the HMC.
2) Power on the HMC, and as soon as the Loading grub message is displayed
quickly press the F1 key to get into grub.
The Grub menu will show one line with the text hmc.
3) On the Grub menu, select e for edit. The next GRUB screen is displayed with two lines:
root (hd0,0)
kernel (hd0,1)/boot/bzImage ro root=/dev/hda2 vga=0x317 apm=power-off
Note: The root device can vary by model: hda2 C03, C04, CR2, and hdc2 for CR3.
4) Move the cursor down to the line starting with kernel. Select e for edit.
Move the cursor to the right and append the following to the end of the string:
V5.1.0 to V6.1.1: init=/bin/bash
V6.1.2 and later: init=/bin/rcpwsh
The final string will vary slightly by version and model:
kernel (hd0,1)/boot/bzImage ro root=/dev/hda2 vga=0x317 apm=power-off init=/bin/rcpwsh
Press the Enter key to save the changes.
5) Press b to boot the changed selection.
This will boot to a bash shell on older HMC's - On newer HMC's this willl prompt you for a new hscroot password after the kernel is loaded and after changing the password it will continue to boot so you can skip the next steps until step 9. You may want to choose a simple password as the keyboard mapping may not match your locale if you are outside the US.
6) Verify root is mounted read/write. If not you may need to rmount it with
mount -o remount,rw /dev/hda2 /
Note: The root device can vary by model: hda2 C03, C04; hdc2 for CR2,CR3; sda2 for CR4.
7) Reset root and hscroot passwords. Run the following commands to reset the passwords. The command will prompt the user to enter the new password and a confirmation password. Any warning concerning the password being too simplistic can be ignored.
Reset root password:
/usr/bin/passwd
Reset hscroot password:
/usr/bin/passwd hscroot
8.) Reboot the HMC (left ctl+left alt+del).
9) Log on as hscroot.
10) Immediately after logon, use the Web-based System Manager (HMC GUI) or the chhmcusr
Edited on: Wed, Mar 13, 2024 15:56Posted in HowTo (RSS), System - AIX (RSS)
Colour output in your scripts
Posted on Wed, Aug 02, 2023 at 13:03 by Hubertus A. Haniel
On Linux I have been using tput to produce colours in my output but then I noticed the other day that this does not actually seem to work on Solaris but I am not sure why so I had to resort to the old fashioned way of using escape sequences. This works perfectly fine in Linux:
#!/bin/bash
GREEN=$(tput setaf 2)
RED=$(tput setaf 1)
YELLOW=$(tput setaf 3)
NOCOL=$(tput sgr0)

echo "This works in Linux...."
echo "This is ${GREEN} Green${NOCOL} in Green"
echo "This is ${RED} Red${NOCOL} in Red"
echo "This is ${YELLOW} Yellow${NOCOL} in Yellow"
echo ""
So on Solaris this would be done like this (And this also works on
Linux):
#!/bin/bash
GREEN="\033[0;32m"
RED="\033[0;31m"
YELLOW="\033[0;33m"
NOCOL="\033[0m"

echo "This works in Linux and Solaris...."
echo -e "This is ${GREEN} Green${NOCOL} in Green"
echo -e "This is ${RED} Red${NOCOL} in Red"
echo -e "This is ${YELLOW} Yellow${NOCOL} in Yellow"
So I guess I am going to have to stick to the second method to make my stuff work across platforms - From the script bits above you can see that a font effect is turned on with a code and you will have you will have to use a reset code "\033[0m" to turn it back off. The \033 ANSI escape sequence has a lot of codes to go in hand with it to do all sort of clever effects.
echo -e "\033[31;1;4mHello\033[0m"
This example above has a comma separated list of codes so you got 31 for red, 1 for bold and 4 for underline and all this is cleared again with 0
This is a table that lists all the effect codes:
| Code | Effect | Note |
|---|---|---|
| 0 | Reset / Normal | all attributes off |
| 1 | Bold or increased intensity | |
| 2 | Faint (decreased intensity) | Not widely supported. |
| 3 | Italic | Not widely supported. Sometimes treated as inverse. |
| 4 | Underline | |
| 5 | Slow Blink | less than 150 per minute |
| 6 | Rapid Blink | MS-DOS ANSI.SYS; 150+ per minute; not widely supported |
| 7 | [[reverse video]] | swap foreground and background colors |
| 8 | Conceal | Not widely supported. |
| 9 | Crossed-out | Characters legible, but marked for deletion. Not widely supported. |
| 10 | Primary(default) font | |
| 11–19 | Alternate font |
Select alternate font n-10
|
| 20 | Fraktur | hardly ever supported |
| 21 | Bold off or Double Underline | Bold off not widely supported; double underline hardly ever supported. |
| 22 | Normal color or intensity | Neither bold nor faint |
| 23 | Not italic, not Fraktur | |
| 24 | Underline off | Not singly or doubly underlined |
| 25 | Blink off | |
| 27 | Inverse off | |
| 28 | Reveal | conceal off |
| 29 | Not crossed out | |
| 30–37 | Set foreground color | See color table below |
| 38 | Set foreground color |
Next arguments are 5;<n> or 2;<r>;<g>;<b>,
see below
|
| 39 | Default foreground color | implementation defined (according to standard) |
| 40–47 | Set background color | See color table below |
| 48 | Set background color |
Next arguments are 5;<n> or 2;<r>;<g>;<b>,
see below
|
| 49 | Default background color | implementation defined (according to standard) |
| 51 | Framed | |
| 52 | Encircled | |
| 53 | Overlined | |
| 54 | Not framed or encircled | |
| 55 | Not overlined | |
| 60 | ideogram underline | hardly ever supported |
| 61 | ideogram double underline | hardly ever supported |
| 62 | ideogram overline | hardly ever supported |
| 63 | ideogram double overline | hardly ever supported |
| 64 | ideogram stress marking | hardly ever supported |
| 65 | ideogram attributes off | reset the effects of all of 60-64 |
| 90–97 | Set bright foreground color | aixterm (not in standard) |
| 100–107 | Set bright background color | aixterm (not in standard) |
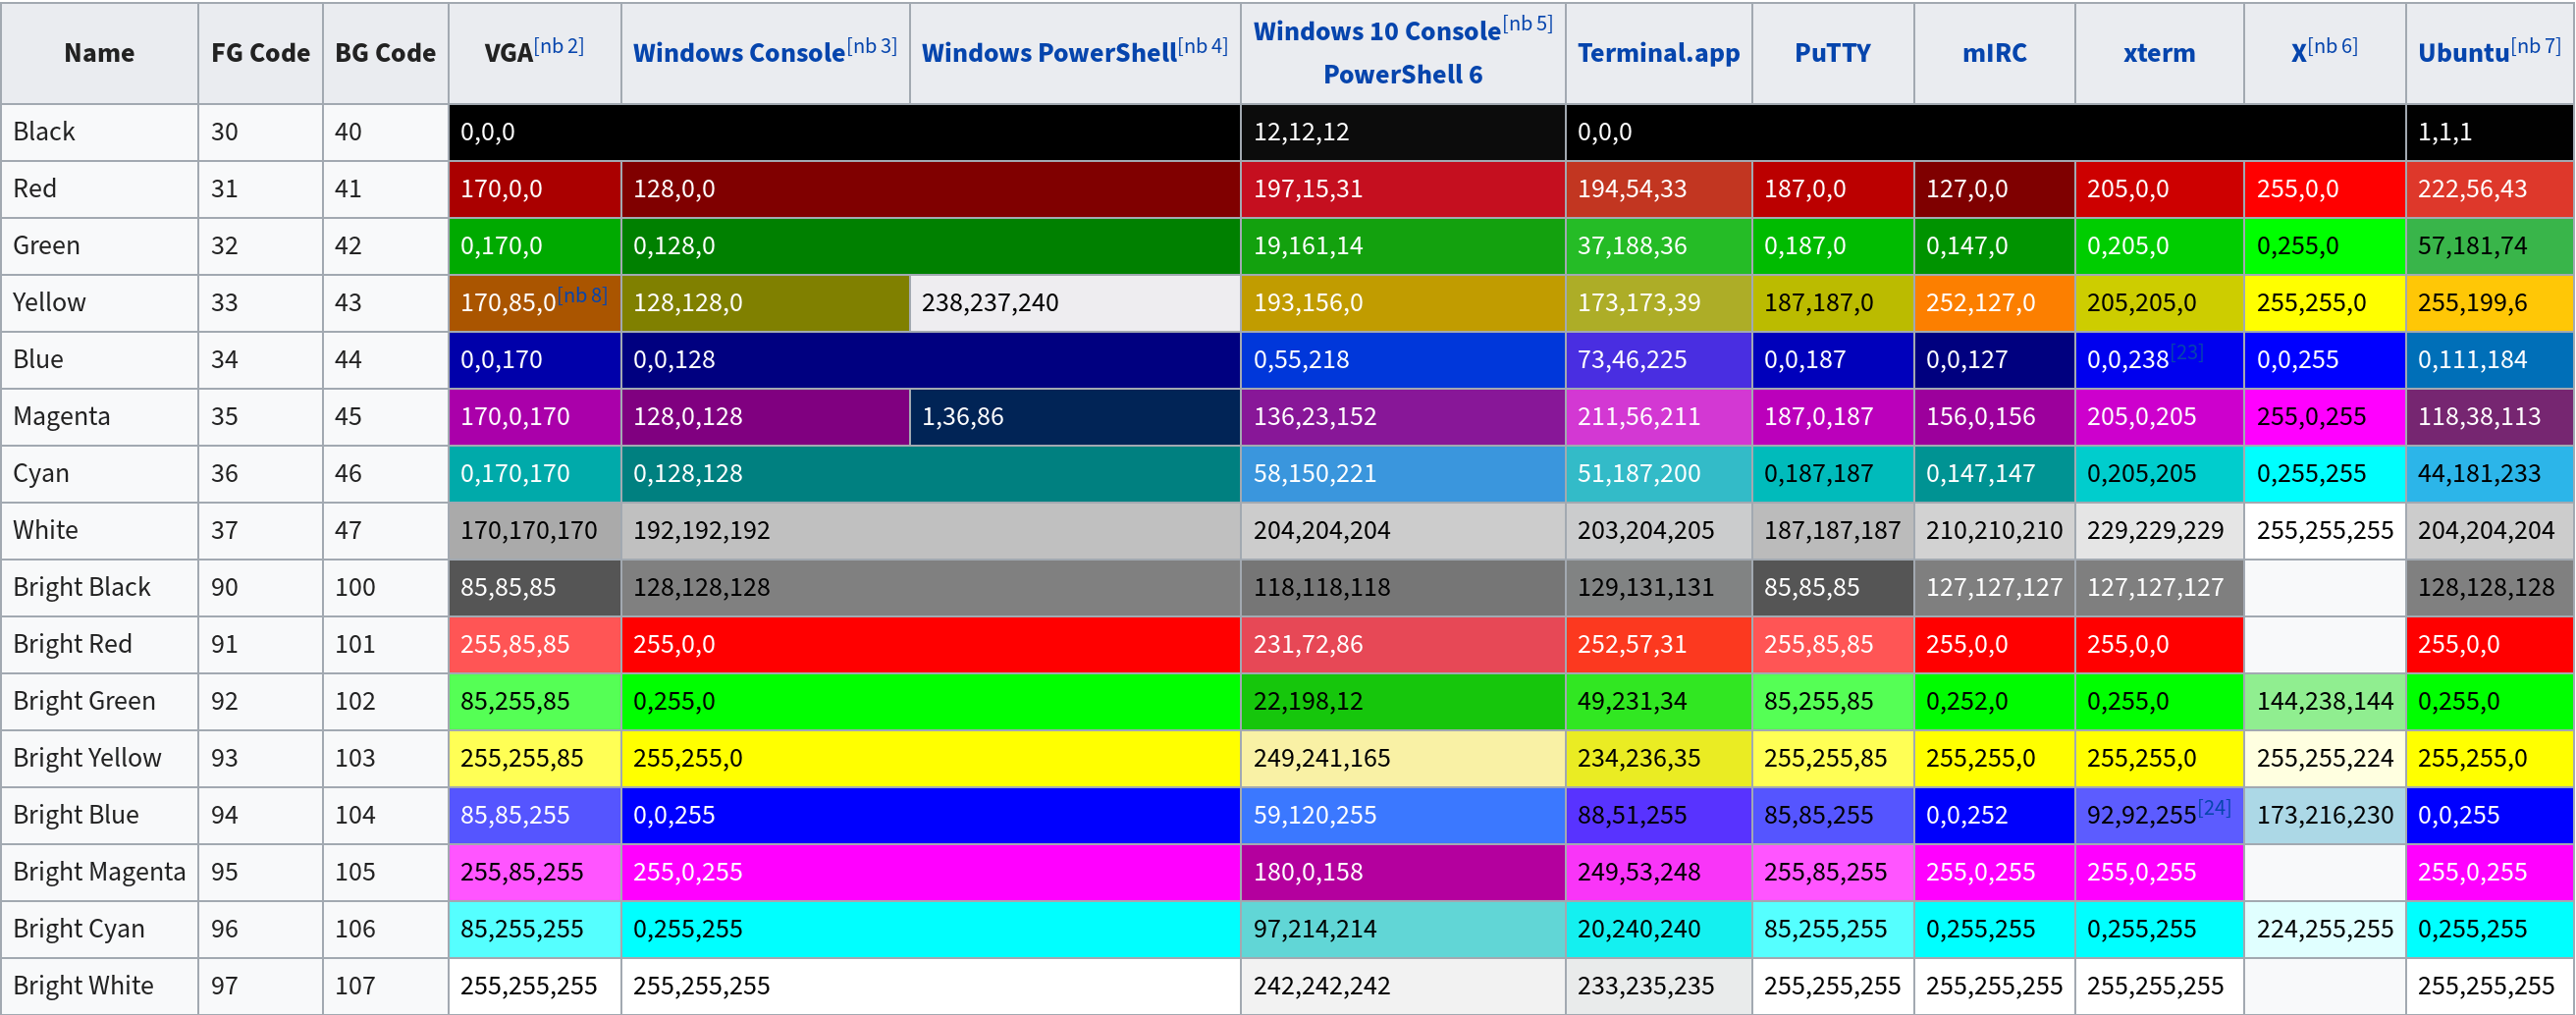
The table below lists the basic 8bit color table which should be sufficient for most cases - there are plenty of other sources to give you 256 colours but in most cases that would not be required
|
|
Posted in HowTo (RSS), Shell Scripting (RSS), System - AIX (RSS), System - Linux (RSS), System - Solaris (RSS)
AIX for System Administrators
Posted on Thu, Jun 08, 2023 at 10:50 by Hubertus A. Haniel
While searching for some specific information on AIX today I came across a really good site which I thought I bookmark here as it contains lots of useful information: - https://aix4admins.blogspot.com/
I hope it will help others as well.
Edited on: Wed, Aug 02, 2023 14:33Posted in HowTo (RSS), System - AIX (RSS)
USB drive going to sleep on Linux? - How to prevent that?
Posted on Mon, Mar 20, 2023 at 14:40 by Hubertus A. Haniel
I have recently been experimenting with some stuff that needed quite a bit of storage but was not throughput intensive so I thought I use some old drives I had lying around with some USB to SATA adapters. It was working like a charm until I discovered that the application was complaining about latency which I eventually pinned down to the drives spinning down if not used for a few minutes. So any time I wanted to read data in short moments but stretched apart for a few minutes I had a delay while the drive was spinning up of about 5 to 10 seconds.
Normally I disable this in the BIOS for all drives because I don't think it actually is very healthy for the drive constantly spinning up and down but that is another debate...
It turned out that the disks actually have a kind of a BIOS setting on their own that is used when they are on USB or not controlled via some other way. - The tools that will be of help here are smartctl, hdparm and sdparm. Unfortunately there is no telling of which tools will work best in your scenario since some of the tools work differently on different models of drives and even more so if they are hanging of USB.
In some cases sdparm is your friend:
sdparm --all /dev/sda | grep STANDBY
  STANDBY_Y     0  [cha: n, def:  0, sav:  0]
  STANDBY       1  [cha: y, def:  1, sav:  0]
The above has power saving enabled - to disable this we can do:
sdparm --clear=STANDBY /dev/sda
Which should set the previous to:
sdparm --all /dev/sda | grep STANDBY
      STANDBY_Y     0 [cha: n, def: 0, sav: 0]
      STANDBY       0 [cha: y, def: 1, sav: 0]
I have also seen in some cases a STANDBY_Z variable that was set to 1 and clearing that did the trick.
The more elegant way is using hdparm but it would not work on all of my drives
 hdparm -B /dev/sdb
   /dev/sdb:
   APM_level = 128
The lower the number of APM_level is the more aggressive is the power management vs I/O numbers below 128 permit spin down and any higher numbers up to 254 prevent spin down - 255 will disable Power Management:
hdparm -B255 /dev/sdb
/dev/sdb:
 setting Advanced Power Management level to disabled
SG_IO: bad/missing sense data, sb[]:  70 00 01 00 00 00 00 0a 00 00 00 00 00 1d 00 00 00 00 00 00 00 00 00 00 00 00 00 00 00 00 00 00
APM_level = off
There is also an hdparm -C and -S option - The -C is used to query the APM_level and -S 0 should diable power saving which did not work for me though - although take a look at the man page with the -Z option for Seagate drives.
I could not get smartcl to work reliably on my USB converter so I can not comment on the usage much as smartctl -g apm on any of my devices would just return unavailable.
Edited on: Mon, Mar 20, 2023 15:39Posted in HowTo (RSS), System - Linux (RSS)
AIX - Get the serial number of the system.
Posted on Fri, Oct 28, 2022 at 11:55 by Hubertus A. Haniel
On AIX the serial number of the system can be retrieved multible ways. - "lsconf | head" will get you the serial number and you can grep it out of that output but actually this is quite an expensive call to make if you are doing this across a large estate to populate your inventory database. lsconf will actually go down and probe the hardware for things and will be quite in efficiant.
The serial number is actually stored on the local filesystem in the ODM which is the system registry for an AIX system and it is much more efficient to retrieve it from there using "odmget CuAt | grep -p systemid"
Posted in HowTo (RSS), System - AIX (RSS)
function cleanexit {} - Clean your shit!
Posted on Mon, Jun 20, 2022 at 11:42 by Hubertus A. Haniel
When writing shell scripts in bash that create temporary files I prefer to stick a clean exit function at the top of the script that runs the clean up no matter how the script exits - this should even remove files when the script got interrupted:
	function cleanexit
	{
		rm -f /var/tmp/tmpfile
	}
	trap cleanexit INT QUIT TERM EXIT
Let me know if you have a better idea!
Edited on: Wed, Aug 02, 2023 14:36Posted in HowTo (RSS), Shell Scripting (RSS), System - AIX (RSS), System - Linux (RSS), System - Solaris (RSS)
How to recover broken grub2 boot on SLES15
Posted on Wed, Nov 25, 2020 at 12:28 by Hubertus A. Haniel
I am currently having issues where the boot of one of my VM's gets corrupted and I frequently have to recover it - I sometimes miss out mounting one of the required mount points so I noted them here to jolt my memory mainly but they may be helpful for others......
These are the steps I currently follow to recover the boot sector:
- - Boot the system from the DVD or PXE into rescue mode
- Mount the existing root file system under /mnt which is on /dev/rootvg/rootlv using "mount /dev/rootvg/rootlv /mnt"
- mount -t proc none /mnt/proc
- mount -t sysfs sys /mnt/sys
- mount -o bind /dev /mnt/dev
- chroot /mnt
- /sbin/mkinitrd (to recreate the initrd for the existing kernel
- /usr/sbin/grub2-mkconfig -o /boot/grub2/grub.cfg (To regenerate the grub config)
- /usr/sbin/grub2-install --force /dev/sda (/dev/sda is my boot disk)
Now exit the chroot jail and reboot the system and hopefully everything should be back to normal
Edited on: Wed, Nov 25, 2020 12:36Posted in HowTo (RSS), System - Linux (RSS)
What is my WWN of my Storage Adapter
Posted on Tue, Mar 13, 2012 at 11:37 by Hubertus A. Haniel
I am frequently being asked on how one finds the WWN for the storage adapter on a modern Linux system with a 2.6 kernel.
This information used to be in /proc but now has been moved into /sys and can be found simply looking into /sys/class/fc_host/host*/portname (host* because you may have multible adapters eg host0 and host1)
On my system I get the following:
cat /sys/class/fc_host/host*/port_name
 0x5000101000000414
 0x5000101000000416
These numbers are required by your storage administrator to present storage to you in an enterprise class storage array.
Posted in HowTo (RSS), System - Linux (RSS)
Linux SCSI rescan? - Reboot!?
Posted on Tue, Dec 06, 2011 at 11:56 by Hubertus A. Haniel
Recently people keep asking me how do I add and remove storage from a Linux system running a 2.6 kernel and get linux to rescan the SCSI bus and add (or remove) storage dynamically with out rebooting.
So here is how to do it:
1 - Find the host number for the HBA:
ls /sys/class/fc_host/
You will have something like host1 or host2
2 - Ask the HBA to issue a LIP signal to rescan the FC bus:
echo 1 > /sys/class/fc_host/host1/issue_lip
3 - Wait for a few seconds for the LIP command to complete
4 - Ask the linux kernel to rescan the SCSI devices on that HBA
echo "- - -" > /sys/class/scsi_host/host1/scan
( - - - means every channel, every target and every lun )
Edited on: Tue, Dec 06, 2011 12:07Posted in HowTo (RSS), System - Linux (RSS)